一、背景
随着操作系统国产化替代的趋势越发明显,软件支持国际化、跨平台,已然是必须做的一件事情。原有的软件UI层用的是MFC,将其换成QT,想必是一种较好的方案。对于大型软件,特别是已发布,但还处于不断迭代的阶段,如果直接更换UI库,那么工作量还是很大,若人员较少,那么时间可能会持续挺久。倘若可以逐步替换,那么就比较经济了。
经过自己的摸索实践,MFC换QT应该是可以做到逐步替换,至少目前经过初步测试,可以支撑我的结论。
二、核心代码说明
- 新建一个MFC多文档程序,在MFC App类中增加一个QApplication* m_pQtApp的成员。
- 在MFC App的InitInstance函数中创建QApplication

BOOL CMFCAppWithQtApp::InitInstance()
{
	//qt 初始化
	int nArgs = 0;
	m_pQtApp = new QApplication(nArgs, nullptr);

	//If this property is true, the applications quits when the last visible
	//primary window (i.e. window with no parent) is closed.
	m_pQtApp->setQuitOnLastWindowClosed(false);

	//其他代码:略
	//....
	//
}- 重载MFC App类的Run函数,使其调用qt的消息循环,针对windows,qt底层实现也是windows的消息循环,所以这里改了,MFC的窗口也能正常工作。
int CMFCAppWithQtApp::Run()
{
//	return CWinAppEx::Run();

	if (!m_pQtApp)
	{
		return -1;
	}

	//调用QT的消息循环
	int nCode = m_pQtApp->exec();
	delete m_pQtApp;
	m_pQtApp = nullptr;
	return nCode;
}
此处相对于MFC的run,少调用了OnIdle函数,根据QT帮助文档可知,可以创建一个超时时间为0的QTimer,然后在超时函数中调用MFC App的OnIdle。如果不调用OnIdle函数,一些功能可能会没有,如UpdateCmdUI将不起作用。
To make your application perform idle processing (by executing a special function whenever there are no pending events), use a QTimer with 0 timeout. More advanced idle processing schemes can be achieved using processEvents().
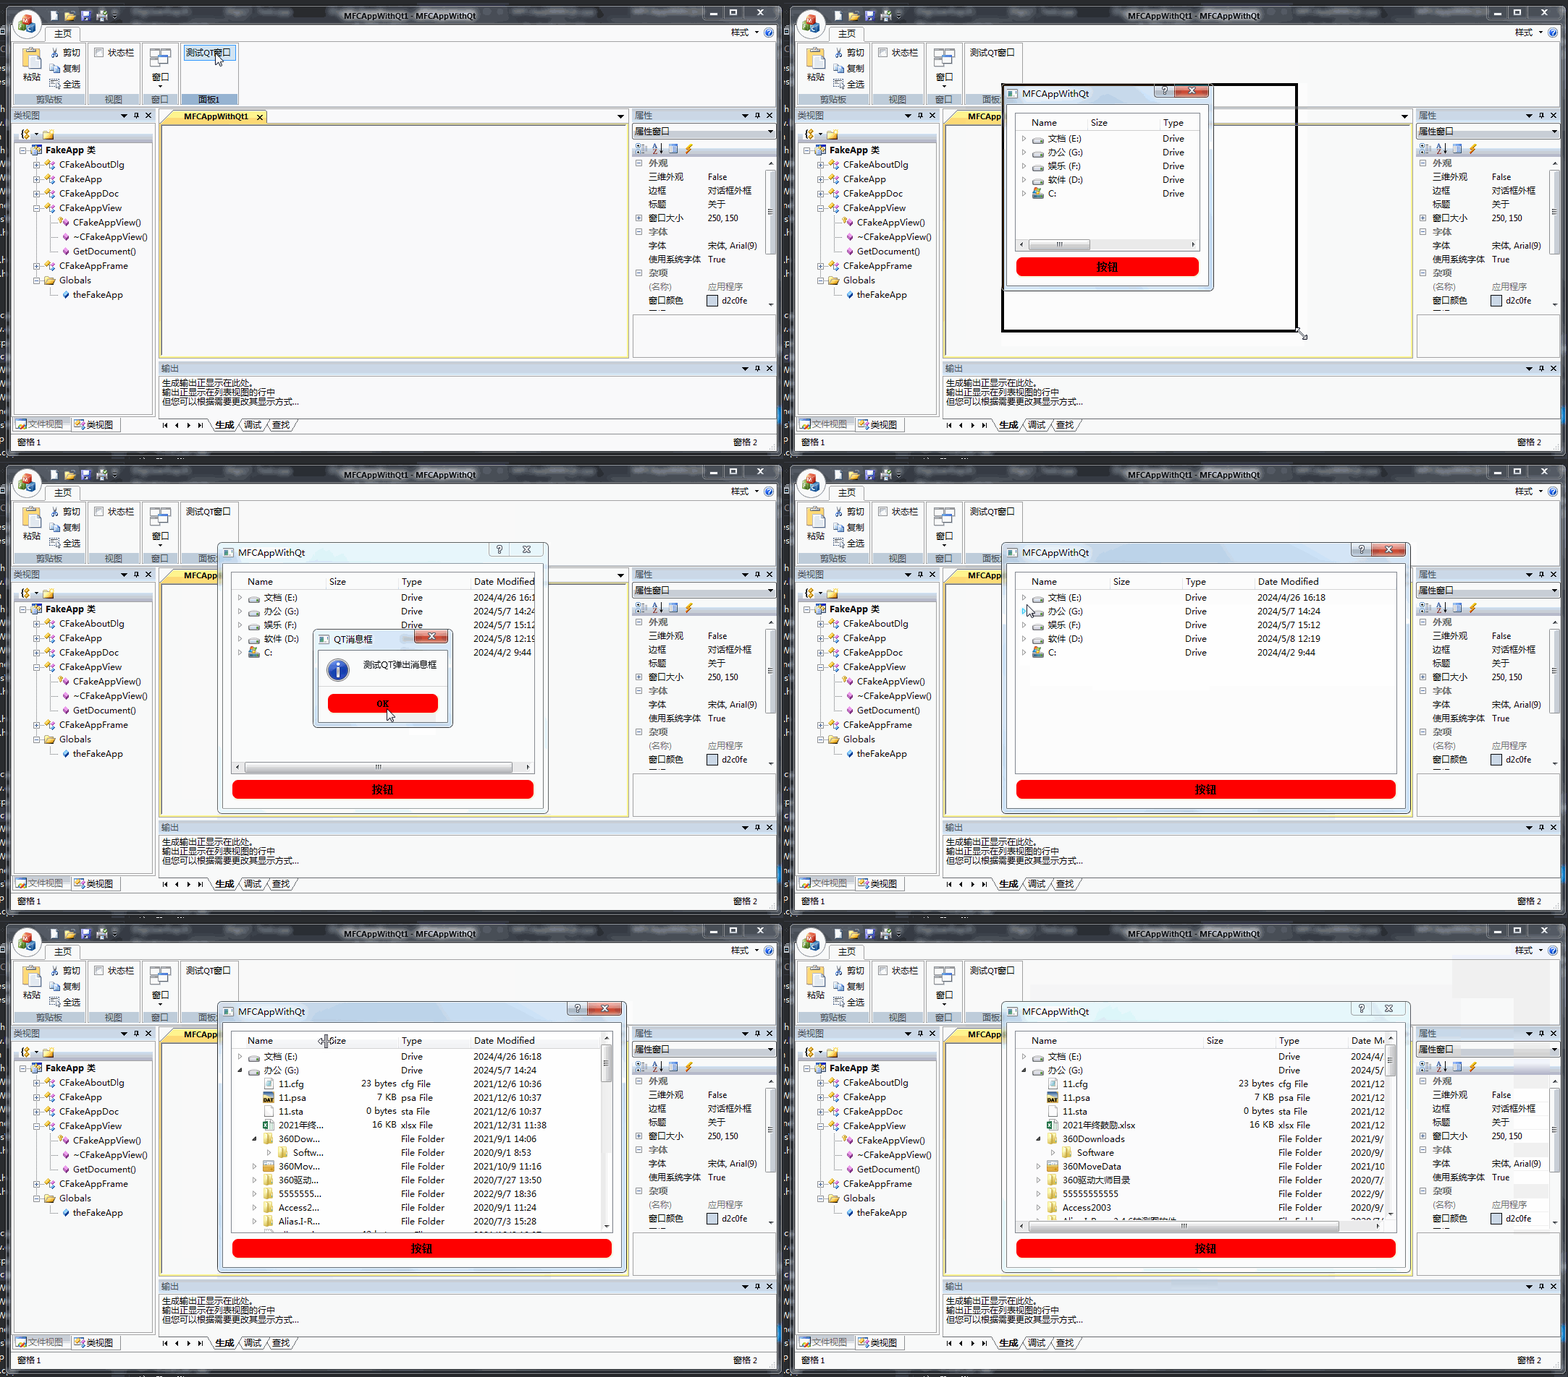
- 从QDialog派生一个对话框类,做下测试,主要测试下qt的窗口显示,以及信号槽机制是否正常工作。
#pragma once

#include <QDialog>

class DlgQT_Test : public QDialog
{
	Q_OBJECT

public:
	DlgQT_Test(QWidget *parent = Q_NULLPTR);
	~DlgQT_Test();

};
#include "stdafx.h" //MFC移值完后再去除
#include "DlgQT_Test.h"
#include ".\GeneratedFiles\Debug\moc_DlgQT_Test.cpp"
#include <QTableWidget>
#include <QVBoxLayout>
#include <QPushButton>
#include <QFileSystemModel>
#include <QDir>
#include <QTreeView>
#include <QMessageBox>
DlgQT_Test::DlgQT_Test(QWidget *parent)
: QDialog(parent)
{
auto pVLayout = new QVBoxLayout();
this->setLayout(pVLayout);
this->setStyleSheet("QPushButton{background-color: rgb(255, 0, 0);border-style: outset;border-width: 2px;border-radius: 10px; border-color: beige;font: bold 14px;min-width: 10em;padding: 6px;}");
QFileSystemModel *model = new QFileSystemModel;
model->setRootPath(QDir::currentPath());
QTreeView *tree = new QTreeView();
tree->setModel(model);
pVLayout->addWidget(tree);
auto pTestBtn = new QPushButton(QStringLiteral("按钮"), this);
pVLayout->addWidget(pTestBtn);
//按钮消息响应
QObject::connect(pTestBtn, &QPushButton::clicked, [=](bool)
{
QMessageBox::information(this, QStringLiteral("QT消息框"),
QStringLiteral("测试QT弹出消息框"));
});
}
DlgQT_Test::~DlgQT_Test()
{
}注意以上代码中有一行#include ".\GeneratedFiles\Debug\moc_DlgQT_Test.cpp" ,因为是MFC工程,moc_DlgQT_Test.cpp文件是我用qt的moc.exe来生成的,然后在此处包含进来参与编译,生成命令为
E:\Qt\Qt5.5.1.5\msvc2013\bin\moc.exe -o .\GeneratedFiles\Debug\moc_DlgQT_Test.cpp .\DlgQT_Test.h注:这里还有另一种方法生成moc的文件,借助vs IDE的功能,在.h 上点击右键,选择属性, 将项目类型选择为自定义生成工具,具体请参看MFC程序中使用QT开发界面的实现步骤,不过原理都一样,但后者是在编译是就会自动生成。
- 在MainFrame类中增加测试函数,打开以上qt对话框,进行测试
void CMainFrame::OnButton2()
{
	DlgQT_Test myQTDlg;
	myQTDlg.exec();
}
三、运行演示

