ConstraintLayout2.x
一、简介
Constraint Layout 是最受欢迎的 Jetpack 库之一,ConstraintLayout2.x不仅包含 1.x 版本中的所有功能,还在 Android Studio(4.0+) 中集成了可以直接预览 XML 的工具,甚至可以直接在预览界面中对布局进行编辑。
二、使用
在项目的build.gradle引入constraint-layout(因为google已经弃用support库,建议迁移到androidx下):
implementation 'androidx.constraintlayout:constraintlayout:2.0.4'三、约束详解
本文只介绍2.x新增部分内容,1.x部分参考:ConstraintLayout1.x
3.1、Flow(2.0中添加)
Flow(androidx.constraintlayout.helper.widget.Flow)允许将一组控件水平或垂直放置,类似于链(Chains),一组控件的引用使用constraint_referenced_ids来设置,id中间使用逗号隔开。
例如,实现一组控件水平展开放置,超出屏幕,自动换行展示:

<?xml versinotallow="1.0" encoding="utf-8"?>
<androidx.constraintlayout.widget.ConstraintLayout xmlns:android="http://schemas.android.com/apk/res/android"
    xmlns:app="http://schemas.android.com/apk/res-auto"
    xmlns:tools="http://schemas.android.com/tools"
    android:layout_width="match_parent"
    android:layout_height="match_parent">
    <Button
        android:id="@+id/bt_flow_a"
        android:layout_width="wrap_content"
        android:layout_height="wrap_content"
        android:text="A" />
    <Button
        android:id="@+id/bt_flow_b"
        android:layout_width="wrap_content"
        android:layout_height="wrap_content"
        android:text="B" />
    <Button
        android:id="@+id/bt_flow_c"
        android:layout_width="wrap_content"
        android:layout_height="wrap_content"
        android:text="C" />
    <Button
        android:id="@+id/bt_flow_d"
        android:layout_width="wrap_content"
        android:layout_height="wrap_content"
        android:text="D" />
    <Button
        android:id="@+id/bt_flow_e"
        android:layout_width="wrap_content"
        android:layout_height="wrap_content"
        android:text="E" />
    <androidx.constraintlayout.helper.widget.Flow
        android:layout_width="match_parent"
        android:layout_height="wrap_content"
        app:constraint_referenced_ids="bt_flow_a,bt_flow_b,bt_flow_c,bt_flow_d,bt_flow_e"
        app:flow_horizontalGap="20dp"
        app:flow_verticalGap="20dip"
        app:flow_wrapMode="aligned"
        app:layout_constraintTop_toTopOf="parent" />
</androidx.constraintlayout.widget.ConstraintLayout>
共有配置如下:
- flow_horizontalStyle = “spread|spread_inside|packed”
约束所有水平链,下方效果模式使用了app:flow_wrapMode="aligned"
- spread效果:
- spread_inside效果:
- packed效果:
- flow_verticalStyle = “spread|spread_inside|packed”
同横向flow_horizontalStyle - flow_horizontalBias = “float”
设置控件所有链的水平偏移,需要app:flow_horizontalStyle="packed"才生效,取值为【0-1】 - flow_verticalBias = “float”
同flow_horizontalBias - flow_horizontalGap = “dimension”
横向间隔 - flow_verticalGap = “dimension”
纵向间隔 - flow_horizontalAlign = “start|end”
水平方向对齐 - flow_verticalAlign = "top|bottom|center|baseline
垂直方向对齐.在app:flow_wrapMode="aligned"模式下好像不生效,其他两种模式生效。
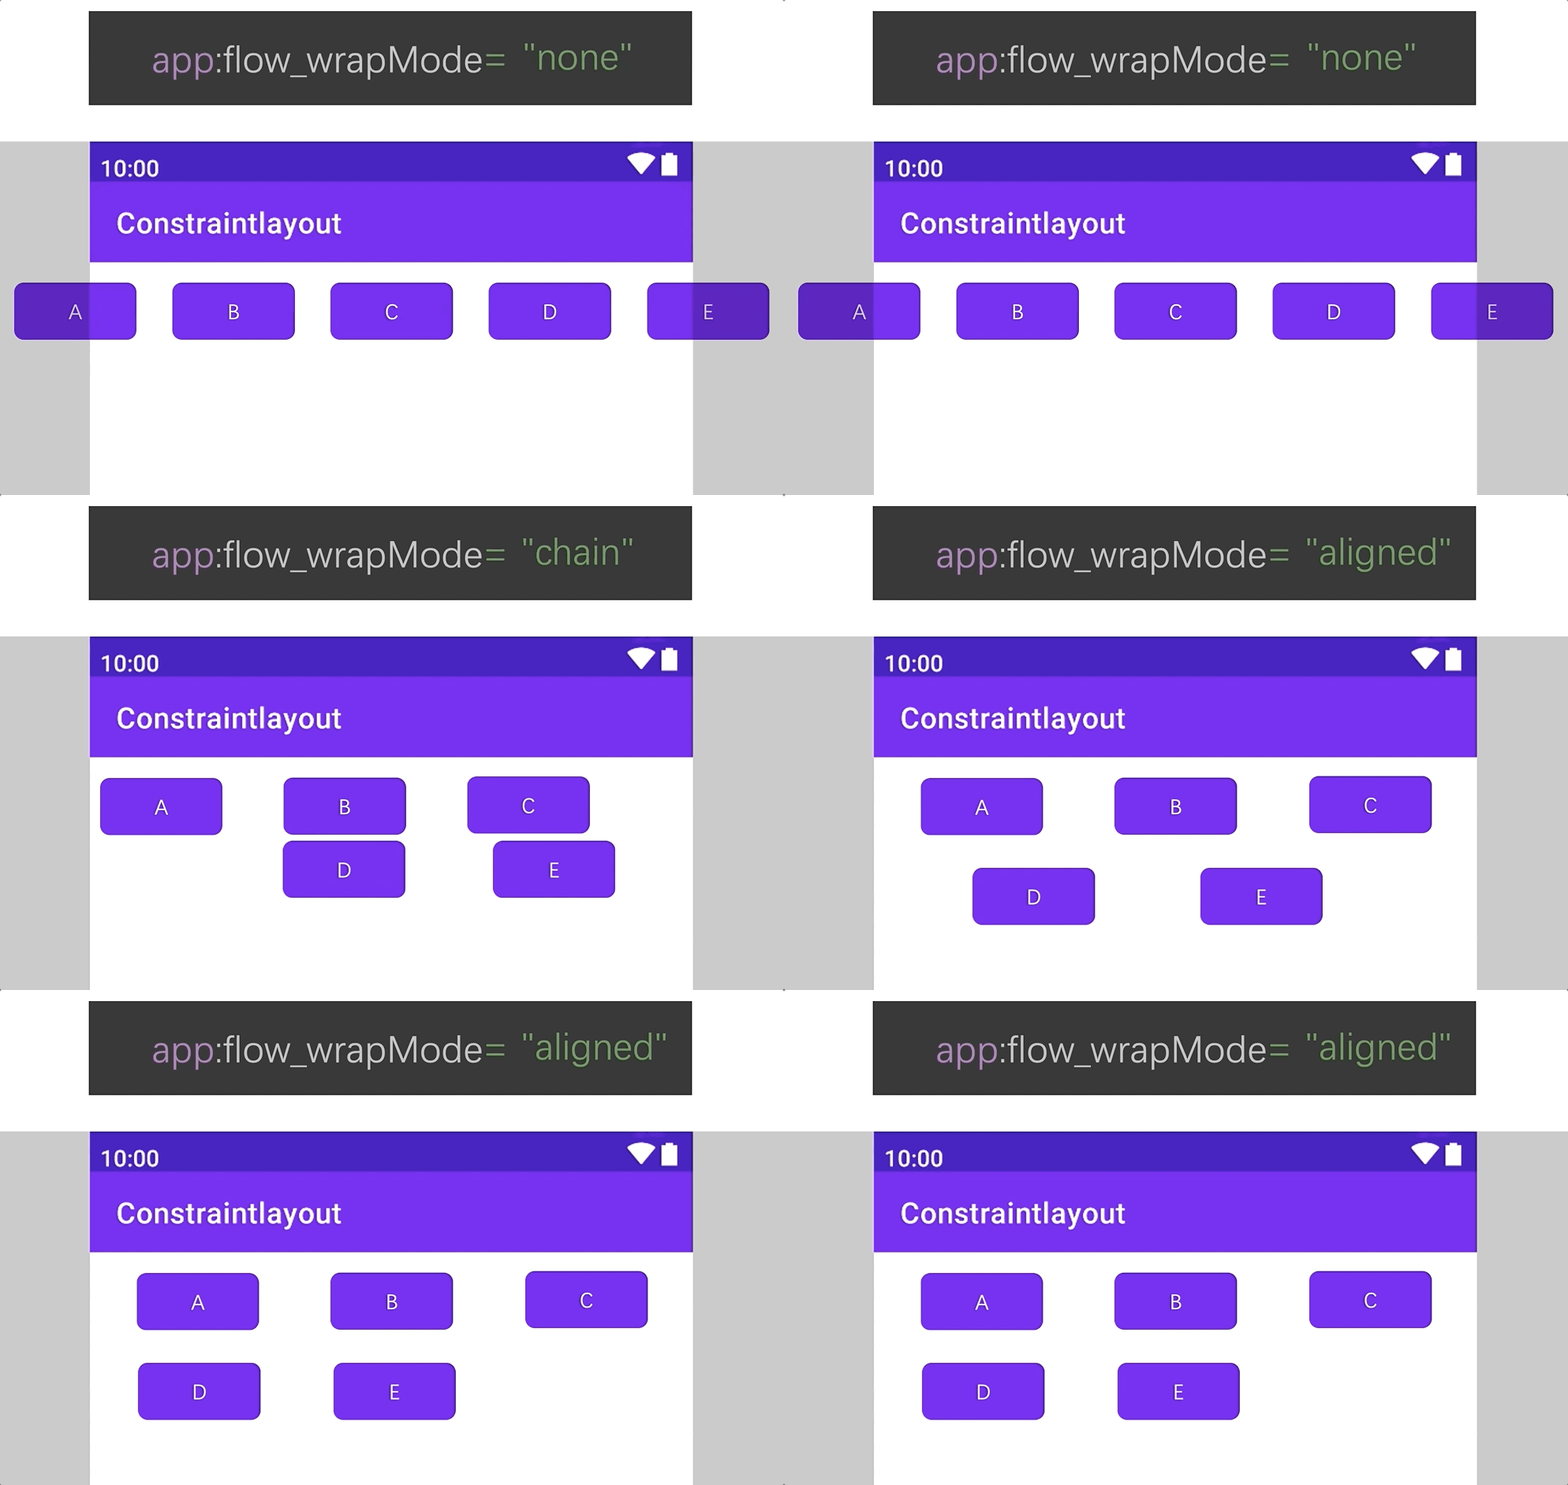
flow_wrapMode属性值有三种:
none
这是flow默认模式,创建一个水平或者垂直链,所有引用的视图以一条链的方式进行布局,如果内容溢出则溢出内容不可见:

chain
当出现溢出时,溢出的内容会自动换行,以新的一条链的方式进行布局:

更多配置:
- flow_firstHorizontalStyle = “spread|spread_inside|packed”
约束第一条水平链,当有多条链(多行)时,只约束第一条链(第一行),其他链(其他行)不约束 - flow_lastHorizontalStyle = “spread|spread_inside|packed”
约束最后一条水平链,当有多条链(多行)时,只约束最后一条链(最后一行),其他链(其他行)不约束 - flow_firstVerticalStyle = “spread|spread_inside|packed”
同flow_firstHorizontalStyle - flow_lastVerticalStyle = “spread|spread_inside|packed”
同flow_lastHorizontalStyle - flow_firstHorizontalBias = “float”
约束第一条水平链偏移,当有多条链(多行)时,只约束第一条链(第一行),其他链(其他行)不约束 - flow_lastHorizontalBias = “float”
约束最后一条水平链偏移,当有多条链(多行)时,只约束最后一条链(最后一行),其他链(其他行)不约束 - flow_firstVerticalBias = “float”
同flow_firstHorizontalBias - flow_lastVerticalBias = “float”
同flow_lastHorizontalBiaschain - flow_maxElementsWrap
设置每条链的最大控件的个数
aligned
同chain 类似,但是不以行而是以列的方式进行布局:

更多配置同chain
3.2、ImageFilterButton(2.0中添加)、ImageFilterView(2.0中添加)
ImageFilterButton(androidx.constraintlayout.utils.widget.ImageFilterButton)、ImageFilterView(androidx.constraintlayout.utils.widget.ImageFilterView)两个控件基本相同,同ImageView与ImageButton之间的关系
现拿ImageFilterView做简单使用说明:
ImageFilterView可对设置的背景图片进行相关的过滤效果设置。
例如:想给一个方形图片设置圆角

<androidx.constraintlayout.utils.widget.ImageFilterView
    android:layout_width="wrap_content"
    android:layout_height="wrap_content"
    android:layout_marginTop="20dip"
    app:round="20dip"
    android:background="@mipmap/ic_launcher"
    app:layout_constraintLeft_toLeftOf="parent"
    app:layout_constraintRight_toRightOf="parent"
    app:layout_constraintTop_toTopOf="parent" />
相关属性解释:
- round=“dimension”
设置图片圆角大小 - roundPercent=“float”
设置图片圆角率【0-1】,如果图片是一个正方形,此时roundPercent设置为1,则是显示一个圆。 - altSrc=“reference”
通过altSrc设置的资源,允许交叉淡入淡出 - saturation=“float”
设置拖的饱和度。0 =灰度,1 =原始,2 =超饱和 - brightness=“float”
设置图片的亮度 0 =黑色,1 =原始,2 =两倍的亮度 - warmth=“float”
设置图片表观色温。 - contrast=“float”
设置图片对比度。1 =不变,0 =灰色,2 =高对比度 - crossfade=“float”
改变使用altSrc设置的资源透明度【0-1】,使得底层图片的显示程度 - overlay=“boolean”
设置altSrc设置的资源图像是在原始图像上淡入淡出还是与它交叉淡入淡出。默认为true。
3.3、Layer(2.0中添加)
Layer(androidx.constraintlayout.helper.widget.Layer)可以将一些空间设置为一个图层,可对该图层进行背景色、可见性、elevation、padding、补间动画等一些操作
例:将一个Imageview和TextView同时设置一个背景色

<?xml versinotallow="1.0" encoding="utf-8"?>
<androidx.constraintlayout.widget.ConstraintLayout xmlns:android="http://schemas.android.com/apk/res/android"
    xmlns:app="http://schemas.android.com/apk/res-auto"
    android:layout_width="match_parent"
    android:layout_height="match_parent">

    <androidx.constraintlayout.helper.widget.Layer
        android:layout_width="wrap_content"
        android:layout_height="wrap_content"
        android:background="#ff00ff"
        app:constraint_referenced_ids="iv_layer_img,tv_layer_text"
        app:layout_constraintBottom_toBottomOf="@id/tv_layer_text"
        app:layout_constraintLeft_toLeftOf="@id/iv_layer_img"
        app:layout_constraintRight_toRightOf="@id/iv_layer_img"
        app:layout_constraintTop_toTopOf="@id/iv_layer_img" />

    <ImageView
        android:id="@+id/iv_layer_img"
        android:layout_width="wrap_content"
        android:layout_height="wrap_content"
        android:padding="8dip"
        android:src="@mipmap/ic_launcher"
        app:layout_constraintLeft_toLeftOf="parent"
        app:layout_constraintRight_toRightOf="parent"
        app:layout_constraintTop_toTopOf="parent" />

    <TextView
        android:id="@+id/tv_layer_text"
        android:layout_width="wrap_content"
        android:layout_height="wrap_content"
        android:text="测试"
        app:layout_constraintLeft_toLeftOf="@id/iv_layer_img"
        app:layout_constraintRight_toRightOf="@id/iv_layer_img"
        app:layout_constraintTop_toBottomOf="@id/iv_layer_img" />
</androidx.constraintlayout.widget.ConstraintLayout>
3.4、MockView(2.0中添加)
MockView(androidx.constraintlayout.utils.widget.MockView),可用于对布局进行原型制作,可以绘制标签(默认为视图ID)以及对角线的基本视图,在构建UI时可用作临时模拟视图。
例如:

<?xml versinotallow="1.0" encoding="utf-8"?>
<androidx.constraintlayout.widget.ConstraintLayout xmlns:android="http://schemas.android.com/apk/res/android"
    xmlns:app="http://schemas.android.com/apk/res-auto"
    android:layout_width="match_parent"
    android:layout_height="match_parent">
    <androidx.constraintlayout.utils.widget.MockView
        android:id="@+id/mv_first"
        android:layout_width="80dp"
        android:layout_height="80dp"
        app:layout_constraintLeft_toLeftOf="parent"
        app:layout_constraintTop_toTopOf="parent" />

    <androidx.constraintlayout.utils.widget.MockView
        android:id="@+id/mv_second"
        android:layout_width="80dp"
        android:layout_height="80dp"
        app:layout_constraintLeft_toRightOf="@id/mv_first"
        app:layout_constraintTop_toBottomOf="@id/mv_first" />


</androidx.constraintlayout.widget.ConstraintLayout>
参数详解:
- mock_label=“string”
设置中间label文字,默认为控件id - mock_labelColor=“color”
设置label文字颜色 - mock_labelBackgroundColor=“color”
设置label背景颜色 - mock_diagonalsColor=“color”
设置辅助线颜色 - mock_showDiagonals=“boolean”
设置是否显示辅助线 - mock_showLabel=“boolean”
设置是否显示label
3.5、MotionLayout(2.0中添加)
MotionLayout(androidx.constraintlayout.motion.widget.MotionLayout)是ConstraintLayout的子类,所以它具有ConstraintLayout所有功能,它能够让开发者给自己的控件更快速的添加动画效果。
MotionLayout布局必须要有一个MotionScene文件,需要在MotionLayout标签中使用app:layoutDescription配置,如果你忘记配置,AndroidSudio会提示你配置,按照提示会自动创建MotionScene文件并配置。
例如:
<?xml version="1.0" encoding="utf-8"?>
<androidx.constraintlayout.motion.widget.MotionLayout xmlns:android="http://schemas.android.com/apk/res/android"
    xmlns:app="http://schemas.android.com/apk/res-auto"
    android:layout_width="match_parent"
    android:layout_height="match_parent"
    app:layoutDescription="@xml/activity_motion_layout_scene"
    app:showPaths="true">

    <View
        android:id="@+id/view_start_status"
        android:layout_width="50dip"
        android:layout_height="50dip"
        android:background="@color/black" />

</androidx.constraintlayout.motion.widget.MotionLayout>activity_motion_layout_scene放置在res/xml文件夹下:
<?xml version="1.0" encoding="utf-8"?>
<MotionScene xmlns:android="http://schemas.android.com/apk/res/android"
    xmlns:app="http://schemas.android.com/apk/res-auto">

    <ConstraintSet android:id="@+id/start">
        <Constraint android:id="@+id/view_start_status" />
    </ConstraintSet>

    <ConstraintSet android:id="@+id/end">
        <Constraint android:id="@id/view_start_status" />
    </ConstraintSet>

    <Transition
        app:constraintSetEnd="@id/end"
        app:constraintSetStart="@+id/start" />
</MotionScene>
上面代码是按照AndroidStudio提示自动创建的。
app:showPaths="true"true是显示动画运动轨迹,测试使用。
元素描述:
<ConstraintSet>
描述约束集
<Transition>
描述两个状态或约束集之间的过渡
元素属性:
- id=“reference”
Transition描述的ID - constraintSetStart=“reference”
使用ConstraintSet描述的用作开始约束或布局文件作为开始约束【例如:@id/start(ConstraintSet描述)或者@layout/start(布局文件)】 - constraintSetEnd=“reference”
使用ConstraintSet描述的用作最终约束或布局文件作为最终约束【例如:@id/end(ConstraintSet描述)或者@layout/end(布局文件)】 - motionInterpolator=“easeInOut|easeIn|easeOut|linear|bounce”
设置差值器【例如:】
-
linear:线性效果 -
easeIn:缓入效果 -
easeOut:缓出效果 -
easeInOut:缓入缓出效果 -
bounce:弹簧效果
- duration=“float”
执行过渡动画所需的时间 - staggered=“float”
float类型,交错移动物体的快速方法 - autoTransition=“none|jumpToStart|jumpToEnd|animateToStart|animateToEnd”
设置动画自动执行效果,无需用户触发(点击或移动)动画
-
none:默认效果 -
jumpToStart:直接到开始约束效果 -
jumpToEnd:直接到最终约束效果 -
animateToStart:执行过度动画到开始约束的效果 -
animateToEnd:执行过度动画到最终约束的效果
<OnSwipe>
可选参数,增加了对触摸处理的支持,一个<Transition> 标签下可以包含多个<OnSwipe>
- touchAnchorId=“reference”
视图的Id,滑动此视图外的区域,能响应滑动效果 - touchRegionId=“reference”
视图的Id,滑动此视图内的区域,能响应滑动效果 - touchAnchorSide=“top|left|right|bottom|middle|start|end”
用户滑动界面时MotionLayout将尝试在touchAnchorId指定的视图和手指之间保持一个恒定的距离,而此属性指定的是手指和View的哪一侧保持恒定的距离(left、right、top、buttom) - maxVelocity=“float”
目标视图的最大速度,当滑动一定速度,目标视图会按照惯性继续运作,进行先加速后减速运行(默认情况)。如果视图运动过程中加速到了我们设置的最大值,那么就是先加速,然后按最大速度匀速运动,最后再减速运动。 - dragDirection=“dragUp|dragDown|dragLeft|dragRight|dragStart|dragEnd”
滑动的方向: dragUp(手指从下往上拖动(↑))、 dragDown(手指从上往下拖动(↓)) 、dragLeft(手指从右往左拖动(←))、 dragRight(手指从左往右拖动(→)) - maxAcceleration=“float”
目标视图的最大加速度,如果想让视图运动更快,则加大其值。默认值1.2 - dragScale=“float”
控制视图相对于滑动长度的移动距离。默认值1.0(视图移动的距离应与滑动距离一致),当值小于1时,视图移动的距离会远远小于滑动距离(例如dragScale值为0.5 , 如果滑动了2dp,目标视图会移动1dp),当值大于1时,视图移动的距离会大于滑动距离(例如dragScale值为1.5 , 如果滑动了2dp,目标视图会移动3dp) - moveWhenScrollAtTop=“boolean”
boolean类型,如果滑动是滚动的,并且View(例如RecyclerView或NestedScrollView)同时滚动和过渡
<OnClick>
可选参数,增加了对触发处理的支持
元素属性:
- targetId=“reference”
设置用来触发过渡动画的那个 View 的 Id - clickAction=“toggle|transitionToEnd|transitionToStart|jumpToEnd|jumpToStart”
点击时视图执行的动作
-
toggle:在 Start场景和 End 场景之间循环的切换。 -
transitionToEnd:过渡到 End 场景 -
transitionToStart:过渡到 Start场景 -
jumpToEnd:不执行过渡动画跳到 End 场景 -
jumpToStart:不执行过渡动画跳到 Start 场景
<KeyFrameSet>
描述一组Key对象,这些对象可以修改约束集之间的动画。
<KeyPosition>
在动画期间控制布局位置
- motionTarget=“reference”
修改路径的视图id - framePosition=“integer”
表示动画的进度,取值范围为[0,100]。30就表示动画进度执行30%的地方 - transitionEasing=“standard|accelerate|decelerate|linear”
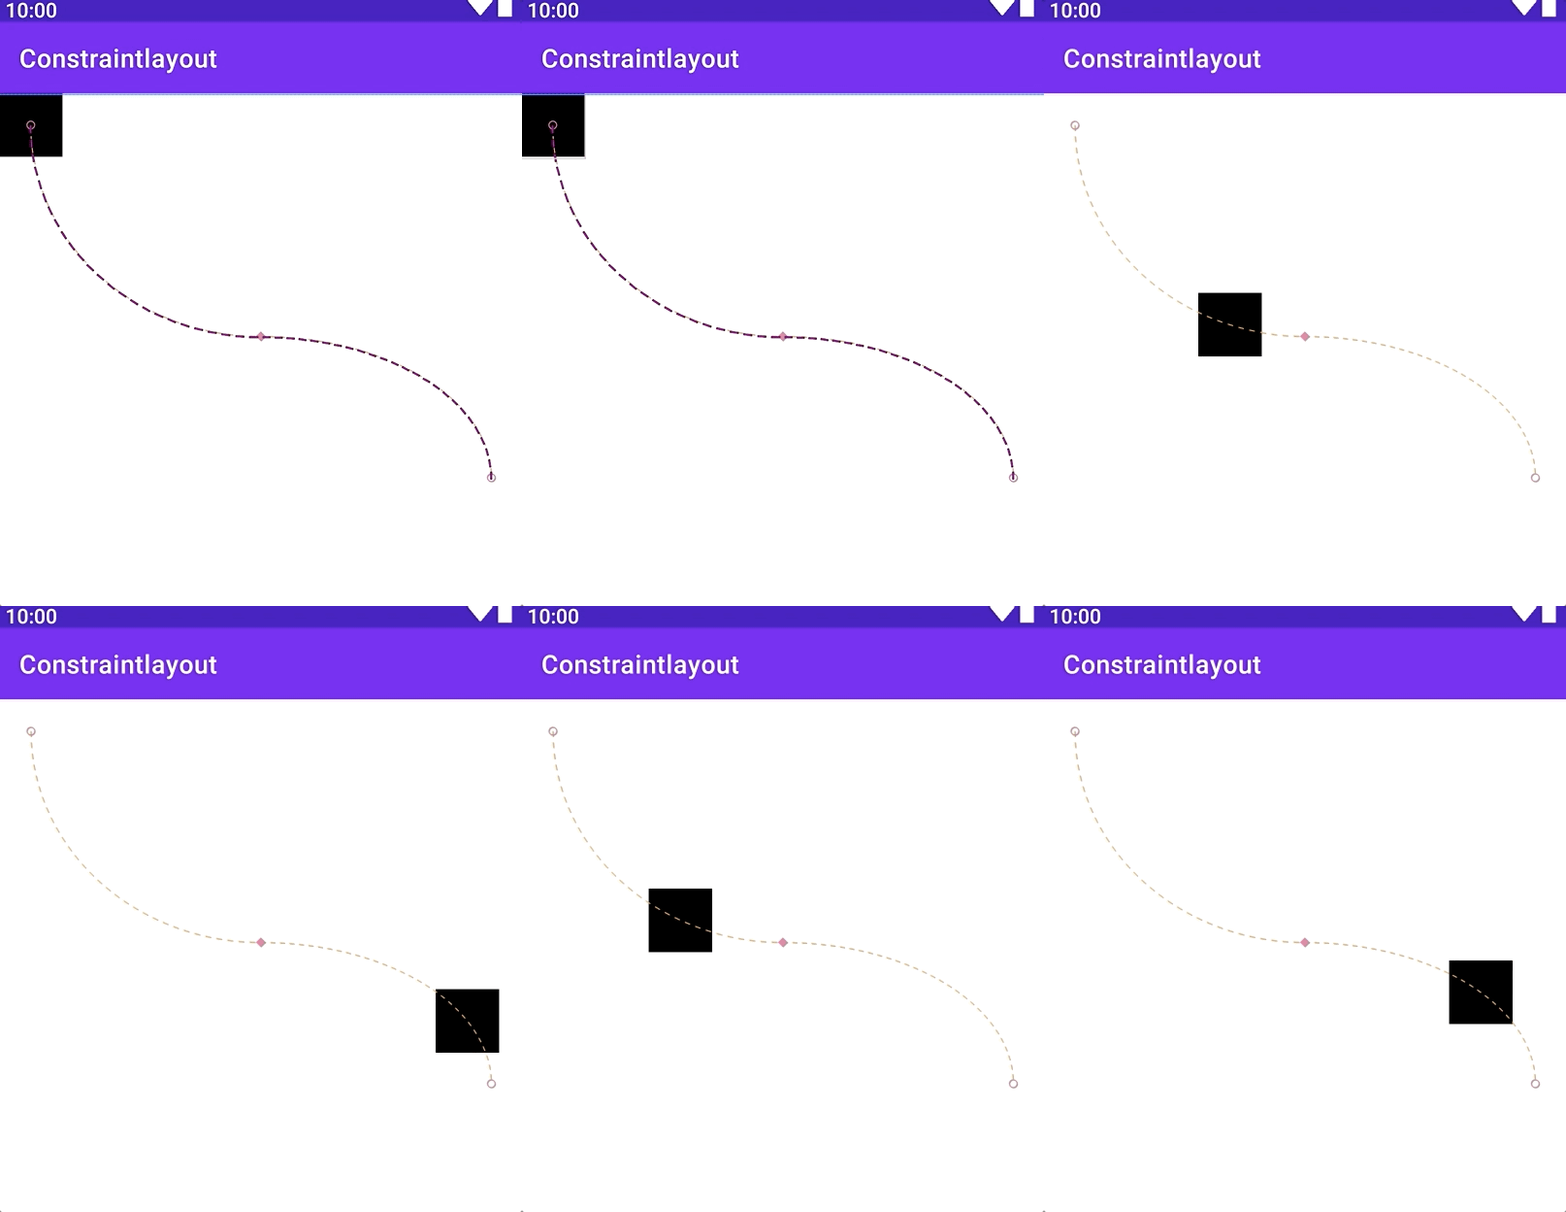
使用的插值器standard:标准accelerate:加速decelerate:减速linear:线性的 - pathMotionArc=“none|startVertical|startHorizontal|flip”
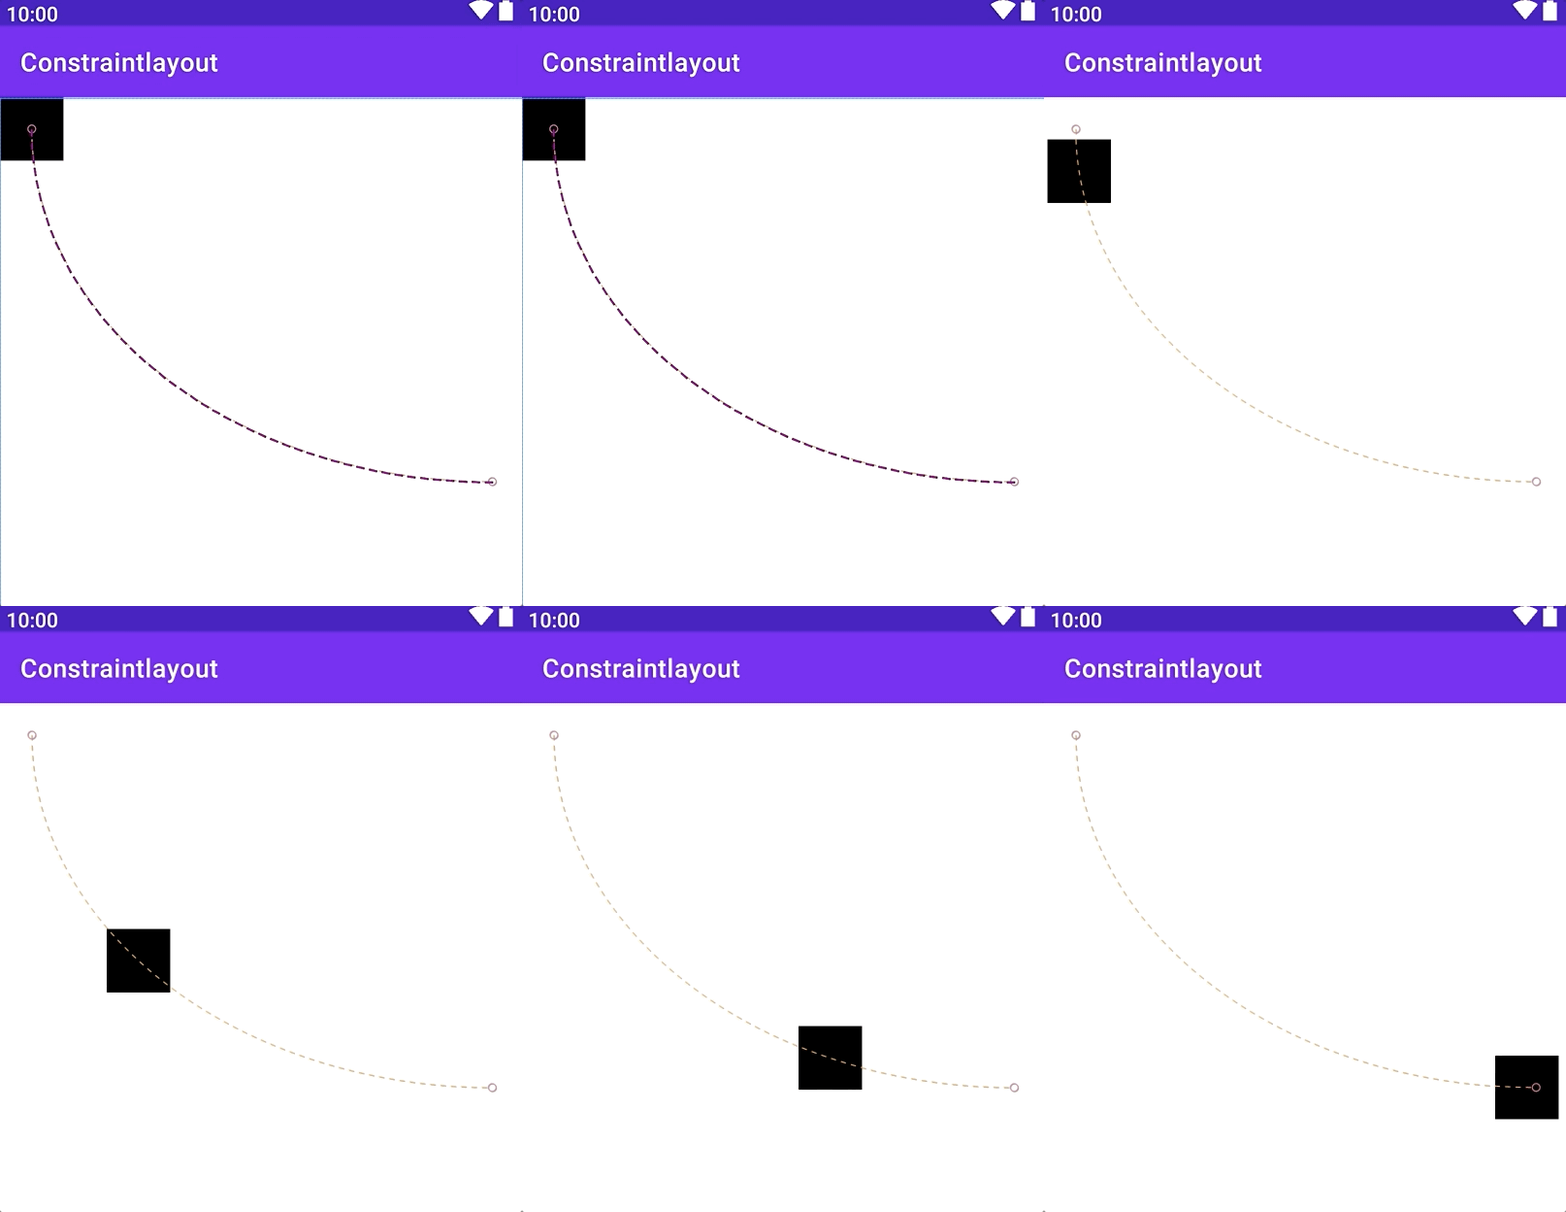
动画以弧形运行,需要在起始的 ConstraintSet 也要加入pathMotionArc属性,此时关键帧处加入pathMotionArc也能生效none:直线运行startVertical:纵向弧形startHorizontal:横向弧形flip:当前弧形翻转
例如:正常不添加关键帧,只是控制View的约束位置,不设置其他参数,执行效果如下直线效果
此时,在起始的 ConstraintSet 也要加入pathMotionArc属性效果如下:
pathMotionArc="startHorizontal"
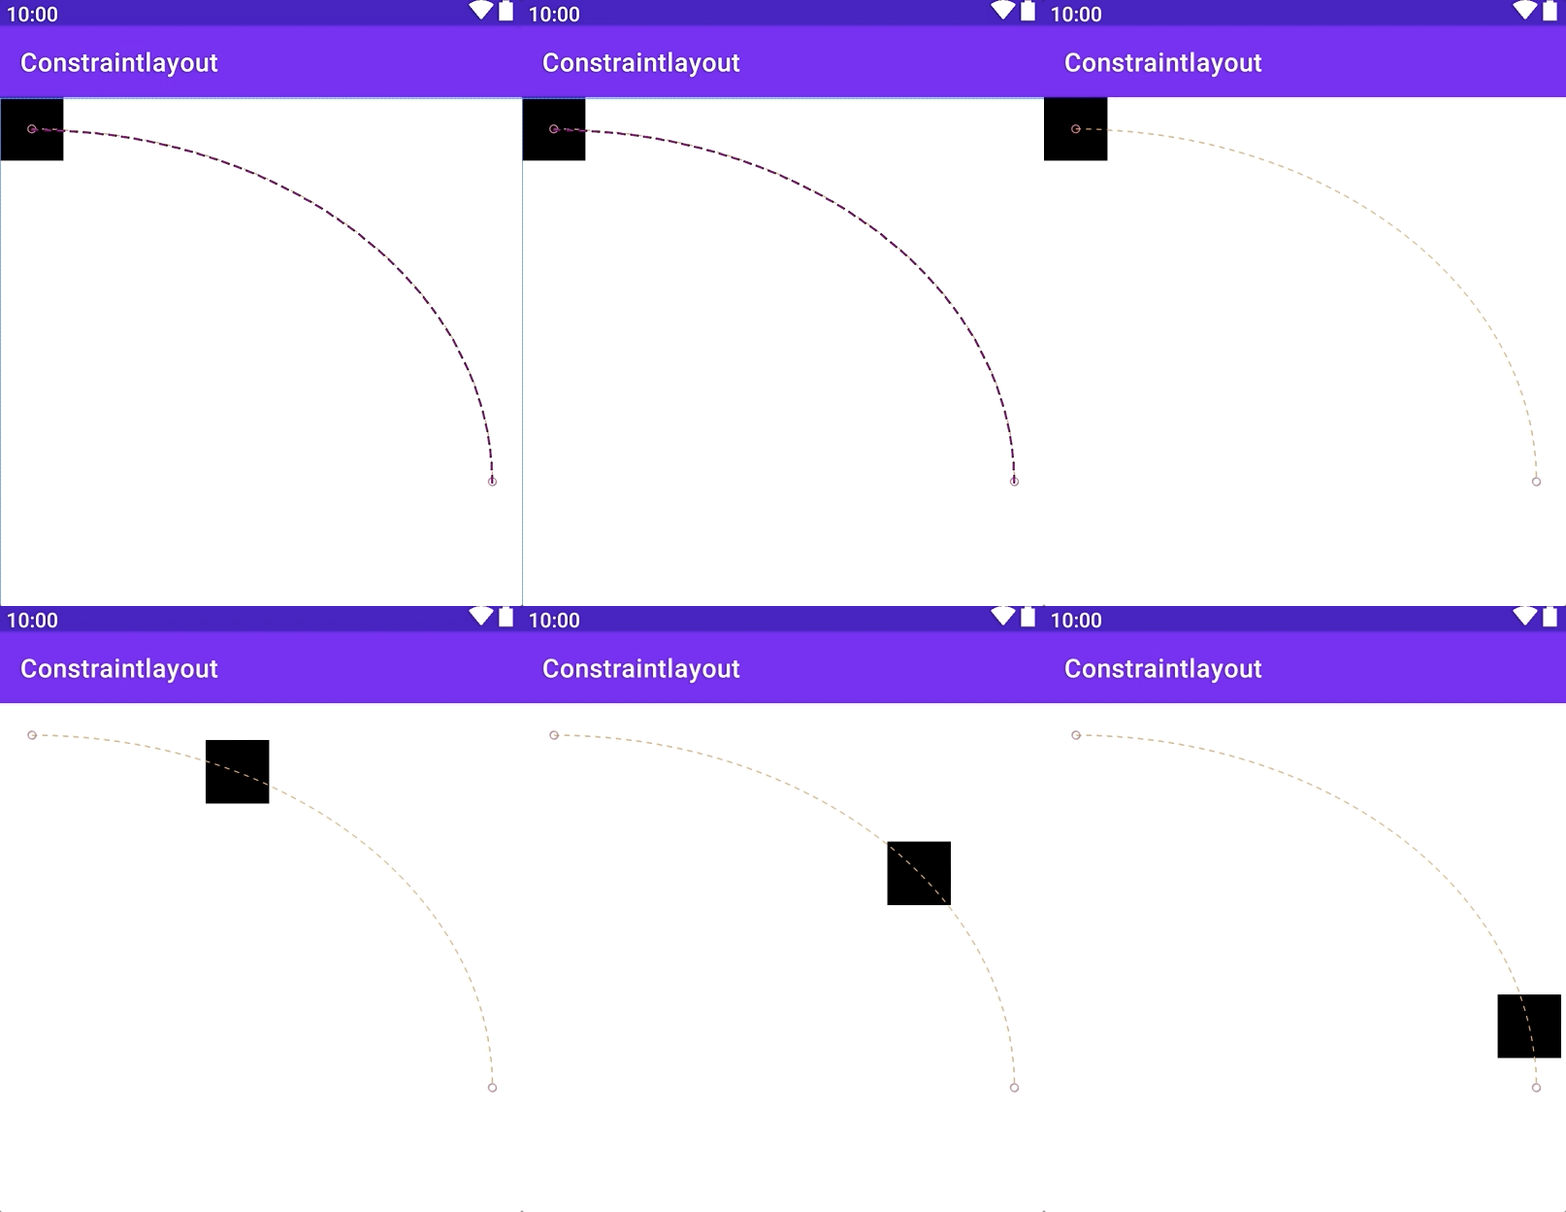
pathMotinotallow="startVertical
此时加入一个关键帧的效果
<KeyFrameSet>
    <KeyPosition
        app:motionTarget="@id/view_start_status"
        app:framePosition="50"
        app:keyPositionType="parentRelative"
        app:percentX="0.5"
        app:percentY="0.3" />
</KeyFrameSet>
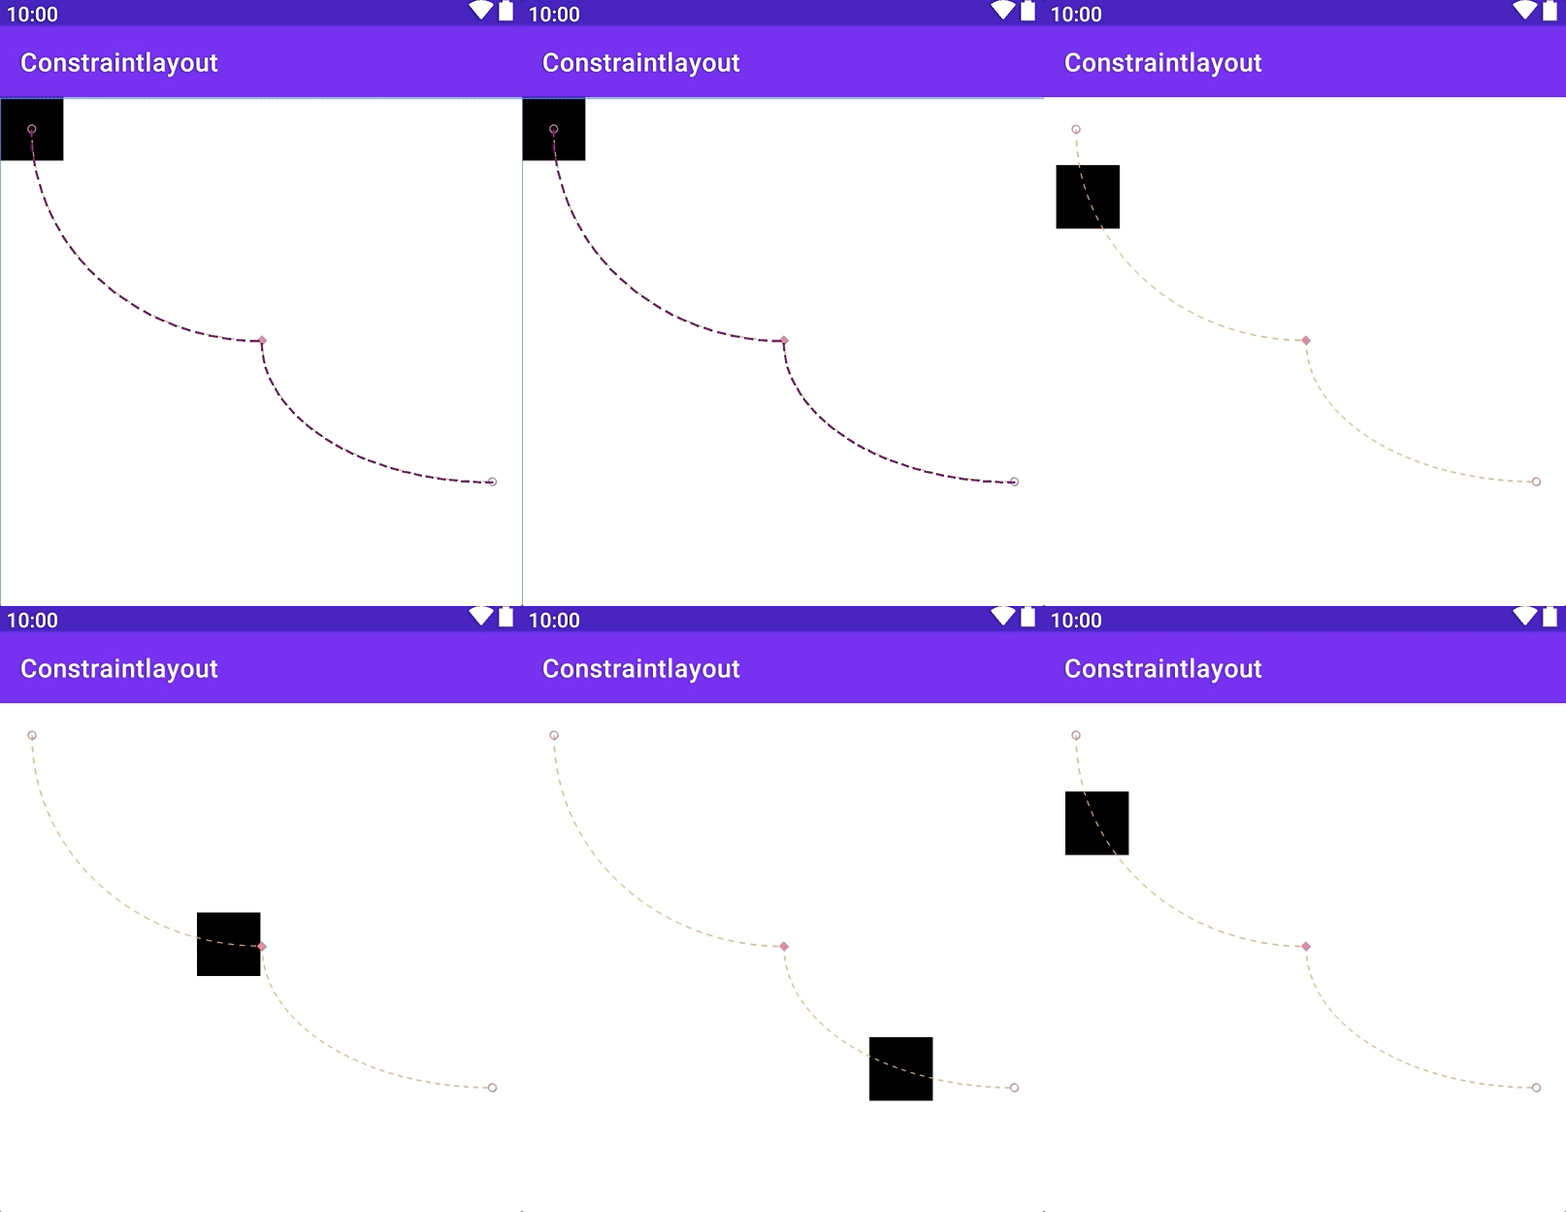
在关键帧处设置pathMotinotallow="startHorizontal"
<KeyFrameSet>
    <KeyPosition
        app:motionTarget="@id/view_start_status"
        app:framePosition="50"
        app:pathMotionArc="startHorizontal"
        app:keyPositionType="parentRelative"
        app:percentX="0.5"
        app:percentY="0.3" />
</KeyFrameSet>
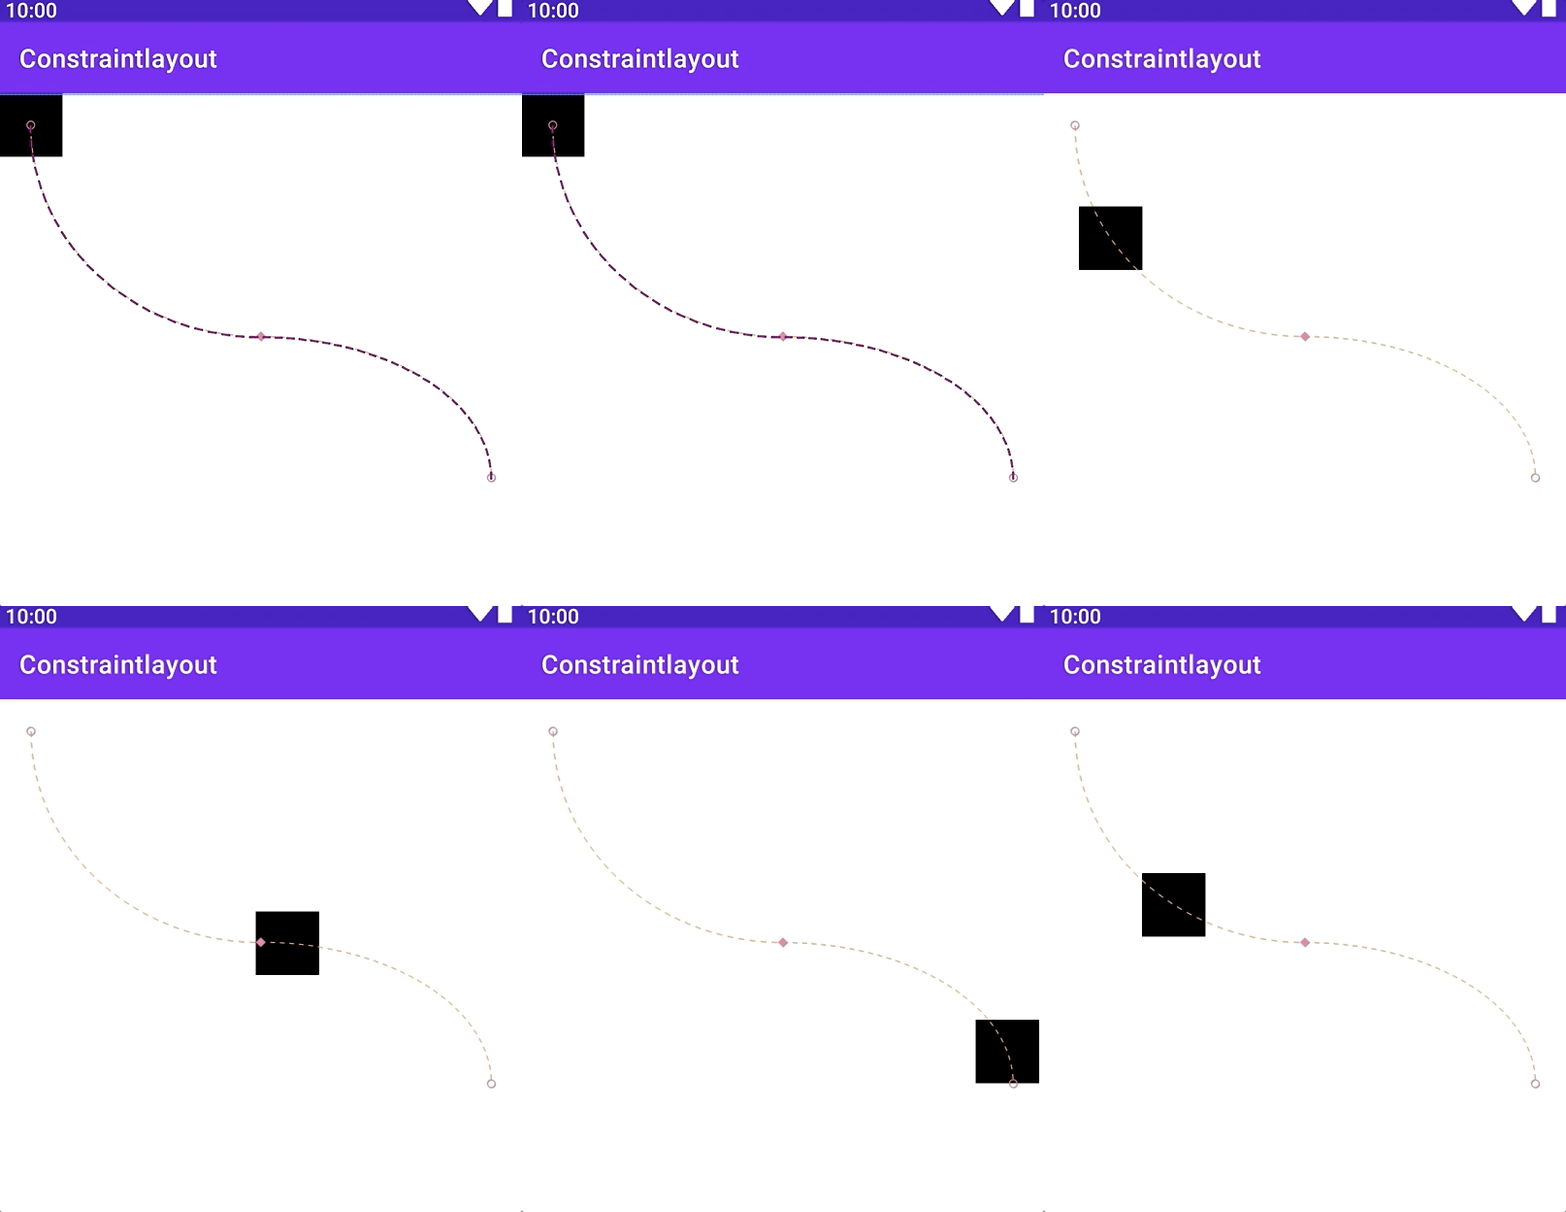
在关键帧处设置pathMotinotallow="none"
<KeyFrameSet>
    <KeyPosition
        app:motionTarget="@id/view_start_status"
        app:framePosition="50"
        app:pathMotionArc="none"
        app:keyPositionType="parentRelative"
        app:percentX="0.5"
        app:percentY="0.3" />
</KeyFrameSet>
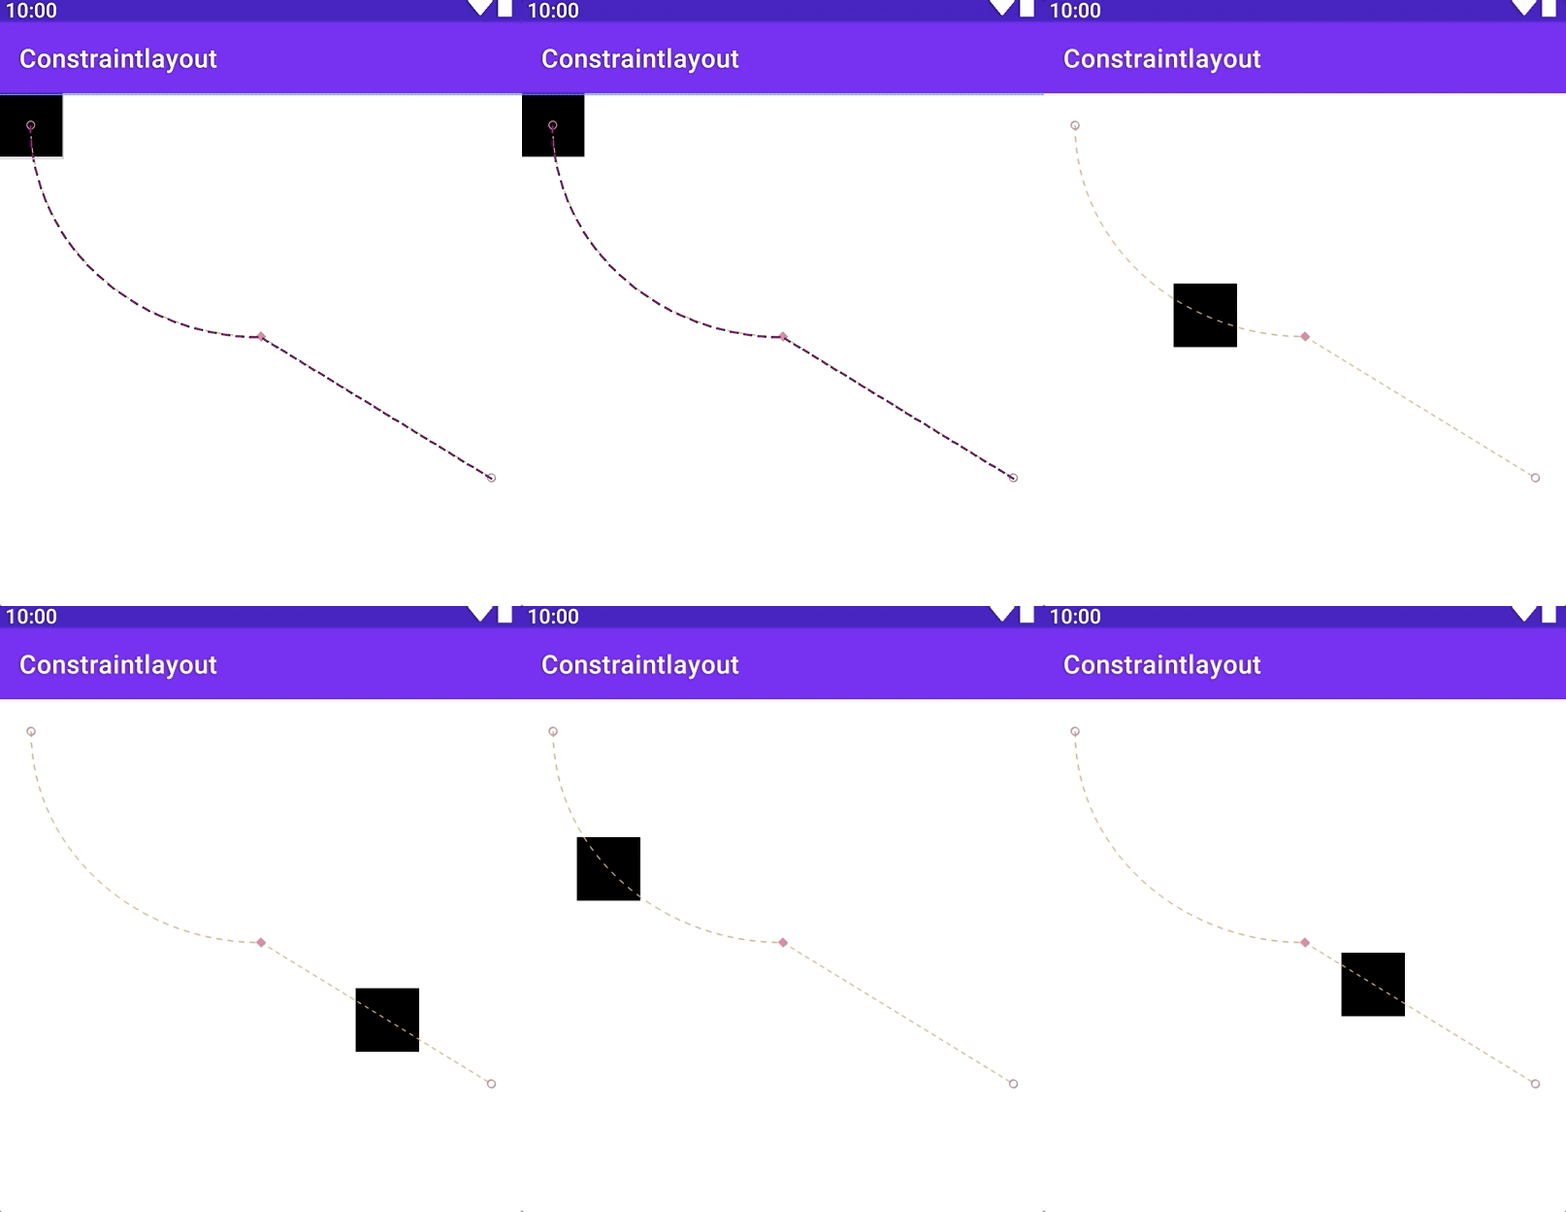
在关键帧处设置pathMotinotallow="flip
<KeyFrameSet>
    <KeyPosition
        app:motionTarget="@id/view_start_status"
        app:framePosition="50"
        app:pathMotionArc="flip"
        app:keyPositionType="parentRelative"
        app:percentX="0.5"
        app:percentY="0.3" />
</KeyFrameSet>
- keyPositionType=“deltaRelative|pathRelative|parentRelative”
关键点的依赖坐标系坐标系
详细说明:parentRelative:相对父容器
<KeyFrameSet>
    <KeyPosition
        app:motionTarget="@id/view_start_status"
        app:framePosition="20"
        app:keyPositionType="parentRelative"
        app:percentX="0.3"
        app:percentY="0.1" />
</KeyFrameSet>

左图为相对与MotionLayout布局建立坐标系,可以看出实际的P点与坐标系中坐标相交点略微偏差。那是因为建立坐标系需要依赖视图本身的中心点为依据,如果你的视图足够小,小到为一个点,此时这种坐标系就是左图情况。而实际上视图不可能那样小,实际状况如右图,依赖控件本身的中心点建立坐标系,此时的P点正好为坐标系中的位置。
deltaRelative:三角定位
<KeyFrameSet>
    <KeyPosition
        app:motionTarget="@id/view_start_status"
        app:framePosition="20"
        app:keyPositionType="deltaRelative"
        app:percentX="0.3"
        app:percentY="0.1" />
</KeyFrameSet>
此方式是以动画起始状态视图中心点为坐标系(0,0)点,动画结束状态为(1,1)建立坐标系,p点为设置的percentX、percentY具体坐标
pathRelative:相对路径
<KeyFrameSet>
    <KeyPosition
        app:motionTarget="@id/view_start_status"
        app:framePosition="20"
        app:keyPositionType="pathRelative"
        app:percentX="0.3"
        app:percentY="0.1" />
</KeyFrameSet>
此方式为以动画起始状态视图中心点(0,0),动画结束状态视图中心点(1,0)建立x轴,x顺时针90度建立y轴,y轴1.0长度与x轴相同。p点为设置的percentX、percentY具体坐标。
- percentX=“float”
相对参考系的横向的比例【0-1】 - percentY=“float”
相对参考系的纵向的比例【0-1】 - sizePercent=“float”
如果视图更改大小,则这将控制大小的增长方式。(对于固定大小的对象,请使用<KeyAttributes>scaleX / Y)
例如设置一个约束起始宽度、高度为50dip ,终止宽度、高度为100dip,如果不设置sizePercent比例效果如下:
<?xml version="1.0" encoding="utf-8"?>
<MotionScene xmlns:android="http://schemas.android.com/apk/res/android"
    xmlns:app="http://schemas.android.com/apk/res-auto">
    <ConstraintSet android:id="@+id/start">
        <Constraint
            android:id="@+id/view_start_status"
            android:layout_width="50dip"
            android:layout_height="50dip"
            app:layout_constraintLeft_toLeftOf="parent"
            app:layout_constraintRight_toRightOf="parent"
            app:layout_constraintTop_toTopOf="parent"/>
    </ConstraintSet>
    <ConstraintSet android:id="@+id/end">
        <Constraint
            android:id="@id/view_start_status"
            android:layout_width="100dip"
            android:layout_height="100dip"
            app:layout_constraintBottom_toBottomOf="parent"
            app:layout_constraintRight_toRightOf="parent"
            app:layout_constraintTop_toTopOf="parent"/>
    </ConstraintSet>
    <Transition
        app:constraintSetEnd="@id/end"
        app:constraintSetStart="@+id/start">
        <KeyFrameSet>
            <KeyPosition
                app:framePosition="50"
                app:keyPositionType="deltaRelative"
                app:motionTarget="@+id/view_start_status"
                app:percentX="0.9"
                app:percentY="0.5" />
        </KeyFrameSet>
    </Transition>
</MotionScene>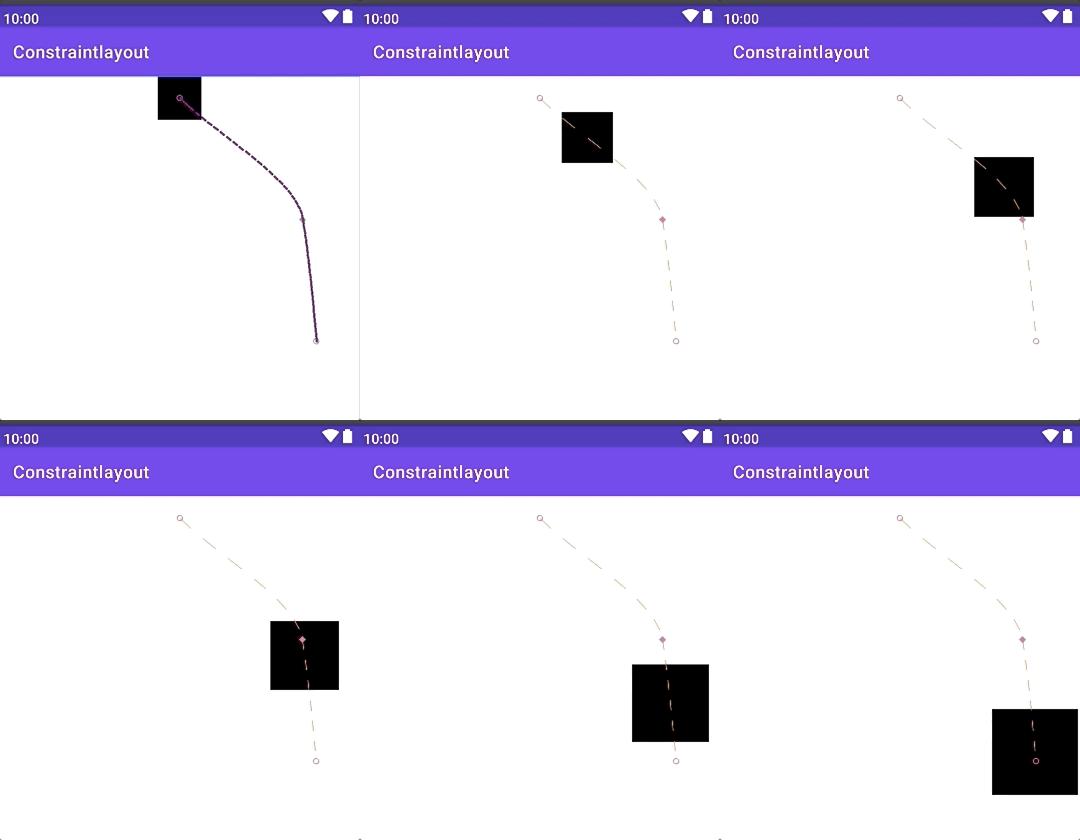
如果设置sizePercent为0.3,效果如下:
<KeyPosition
    app:framePosition="50"
    app:sizePercent="0.3"
    app:keyPositionType="deltaRelative"
    app:motionTarget="@+id/view_start_status"
    app:percentX="0.9"
    app:percentY="0.5" />
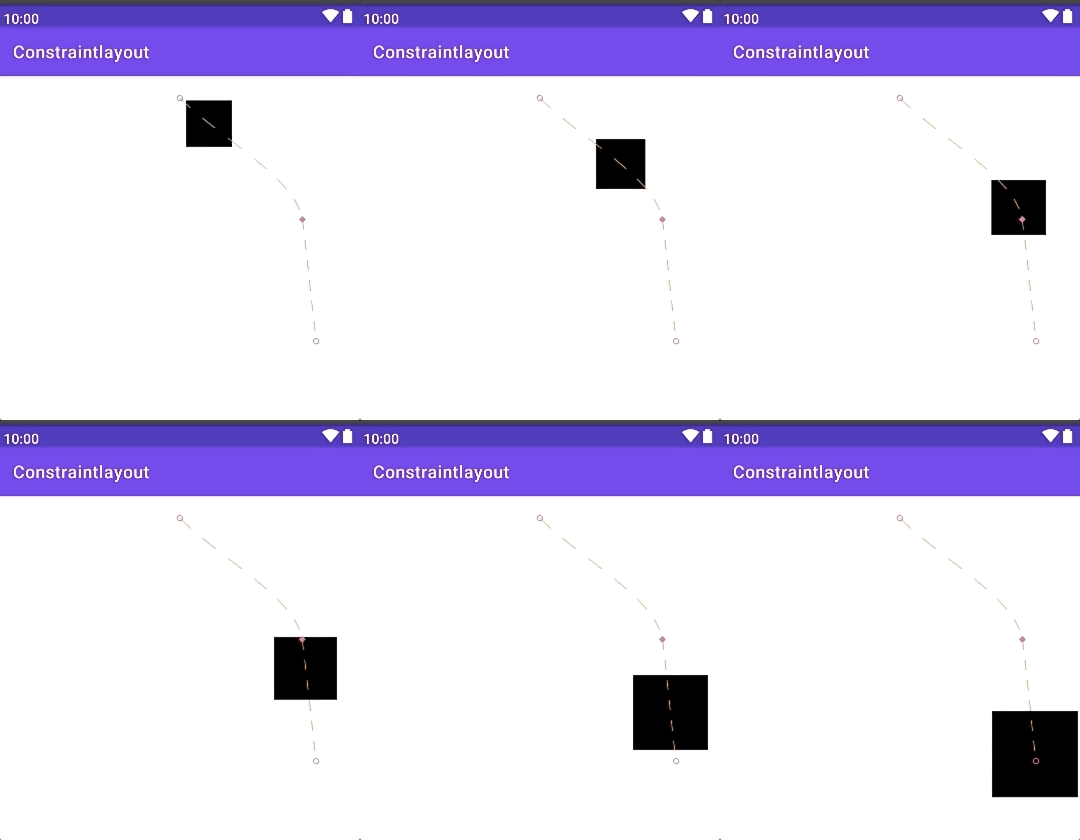
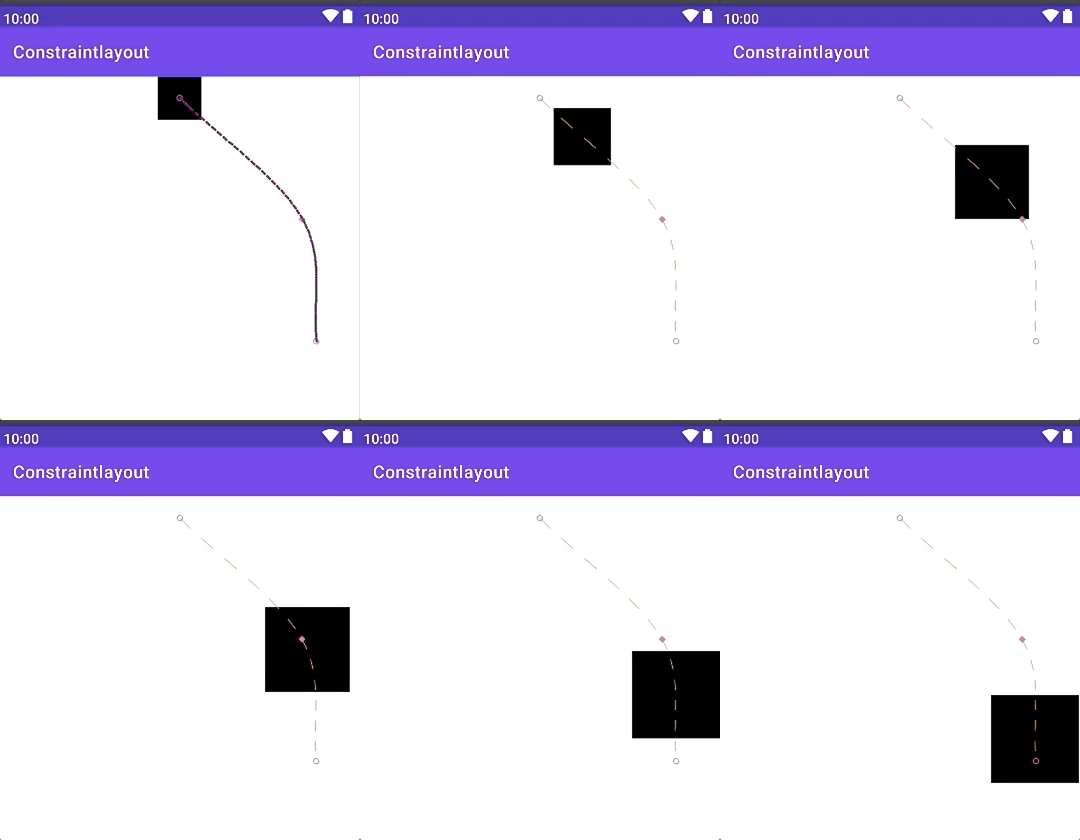
如果设置sizePercent为0.9,效果如下:
<KeyPosition
    app:framePosition="50"
    app:sizePercent="0.3"
    app:keyPositionType="deltaRelative"
    app:motionTarget="@+id/view_start_status"
    app:percentX="0.9"
    app:percentY="0.5" />
- percentWidth=“float”
宽度变化的百分比,如果宽度没有变化,则此属性无效。将会覆盖sizePercent。
例如设置一个约束起始宽度为50dip ,终止宽度为100dip,如果不设置percentWidth比例效果如下:
<?xml versinotallow="1.0" encoding="utf-8"?>
<MotionScene xmlns:android="http://schemas.android.com/apk/res/android"
    xmlns:app="http://schemas.android.com/apk/res-auto">
    <ConstraintSet android:id="@+id/start">
        <Constraint
            android:id="@+id/view_start_status"
            android:layout_width="50dip"
            android:layout_height="50dip"
            app:layout_constraintLeft_toLeftOf="parent"
            app:layout_constraintRight_toRightOf="parent"
            app:layout_constraintTop_toTopOf="parent"/>
    </ConstraintSet>
    <ConstraintSet android:id="@+id/end">
        <Constraint
            android:id="@id/view_start_status"
            android:layout_width="100dip"
            android:layout_height="50dip"
            app:layout_constraintBottom_toBottomOf="parent"
            app:layout_constraintRight_toRightOf="parent"
            app:layout_constraintTop_toTopOf="parent"/>
    </ConstraintSet>
    <Transition
        app:constraintSetEnd="@id/end"
        app:constraintSetStart="@+id/start">
        <KeyFrameSet>
            <KeyPosition
                app:framePosition="20"
                app:keyPositionType="deltaRelative"
                app:motionTarget="@+id/view_start_status"
                app:percentX="0.3"
                app:percentY="0.1" />
        </KeyFrameSet>
    </Transition>
</MotionScene>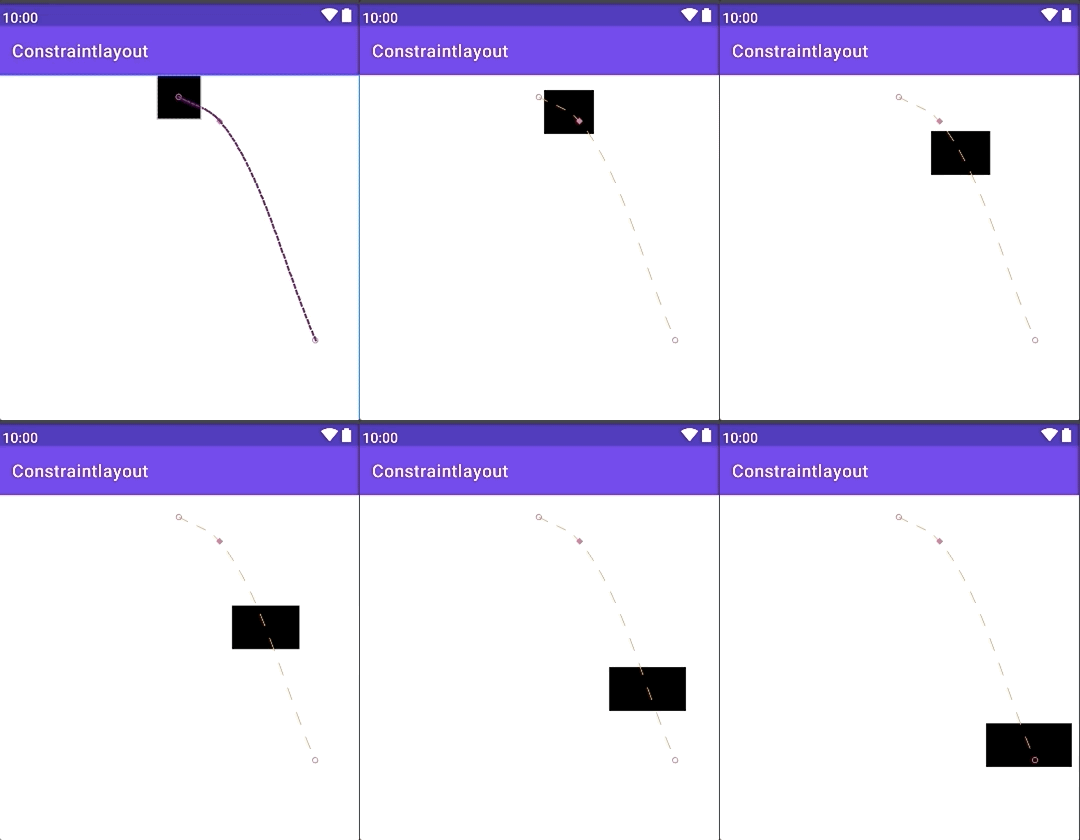
如果设置percentWidth为0.3,效果如下:
<KeyPosition
    app:framePosition="20"
    app:percentWidth="0.3"
    app:keyPositionType="deltaRelative"
    app:motionTarget="@+id/view_start_status"
    app:percentX="0.3"
    app:percentY="0.1" />
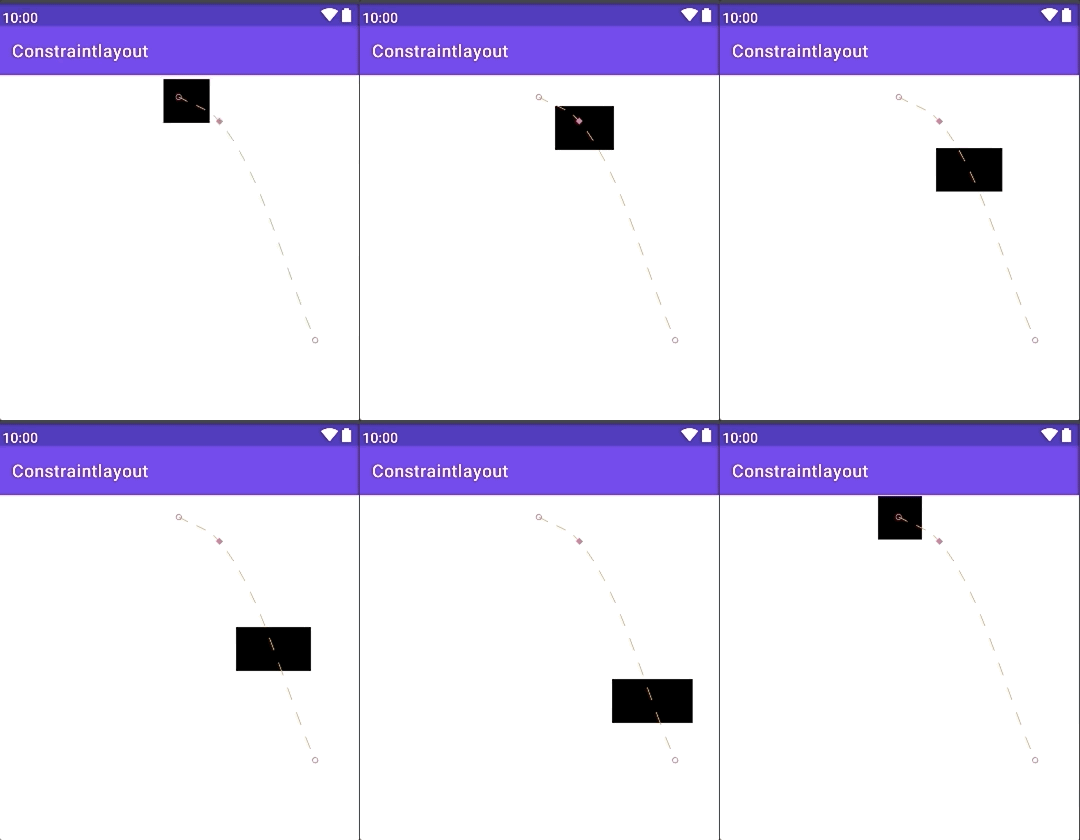
如果设置percentWidth为0.9,效果如下:
<KeyPosition
    app:framePosition="20"
    app:percentWidth="0.3"
    app:keyPositionType="deltaRelative"
    app:motionTarget="@+id/view_start_status"
    app:percentX="0.9"
    app:percentY="0.1" />
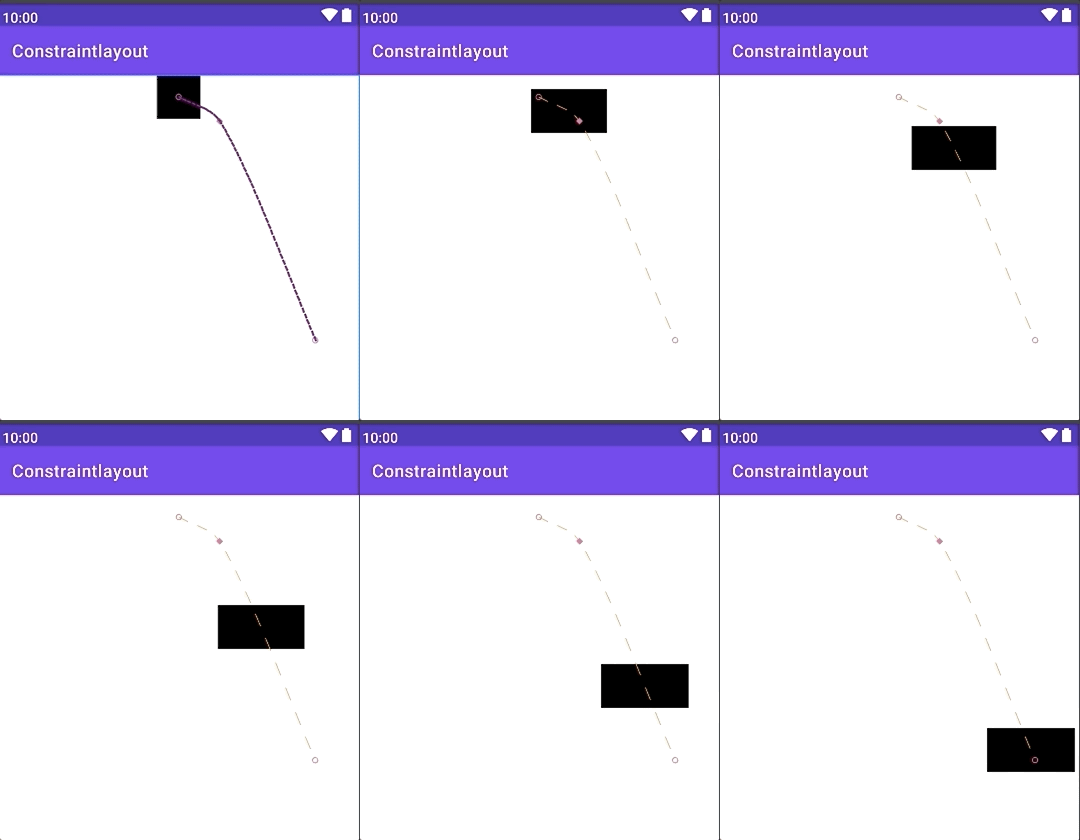
- percentHeight=“float”
高度变化的百分比,如果高度没有变化,则此属性无效。将会覆盖sizePercent。具体效果同percentWidth - curveFit=“spline|linear”
设置动画运动路径:spline(曲线,默认)、linear(直线)
如果不设置curveFit属性或设置curveFit=“spline"(它将是曲线运行):
<KeyPosition
    app:framePosition="50"
    app:keyPositionType="deltaRelative"
    app:motionTarget="@+id/view_start_status"
    app:percentX="0.9"
    app:percentY="0.5" />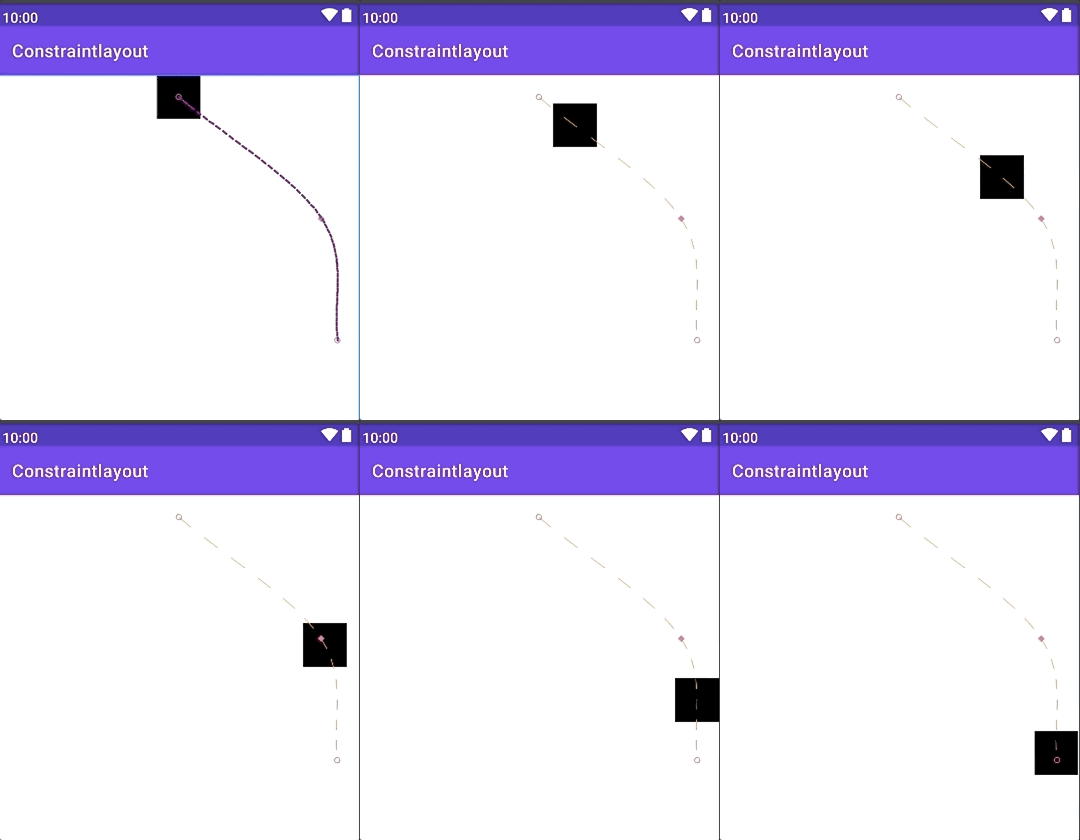
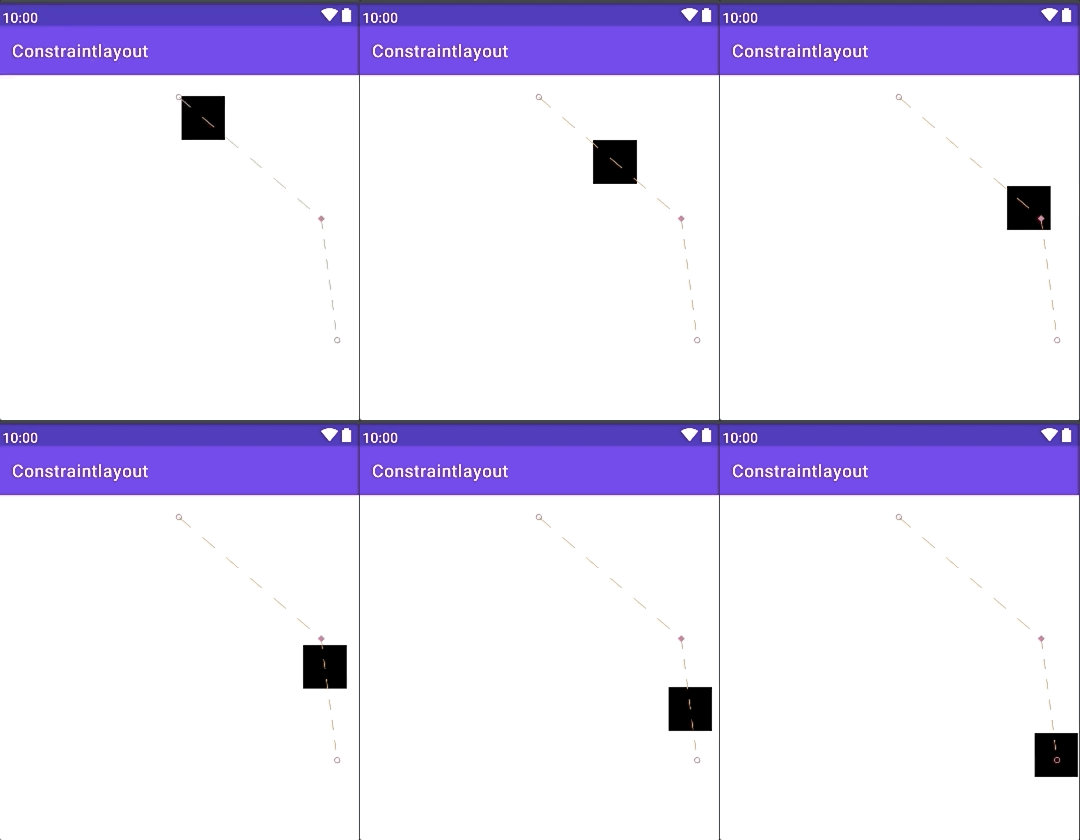
如果设置curveFit=“linear”(它将是直线运行)
<KeyPosition
app:framePosition="50"
app:keyPositionType="deltaRelative"
app:curveFit="linear"
app:motionTarget="@+id/view_start_status"
app:percentX="0.9"
app:percentY="0.5" />
- drawPath=“none|path|pathRelative|deltaRelative|asConfigured|rectangles”
调试使用,绘制布局动画路径及参考线。
例如设置drawPath=“pathRelative”
<KeyPosition
    app:framePosition="50"
    app:sizePercent="0.9"
    app:drawPath="pathRelative"
    app:keyPositionType="deltaRelative"
    app:motionTarget="@+id/view_start_status"
    app:percentX="0.9"
    app:percentY="0.5" />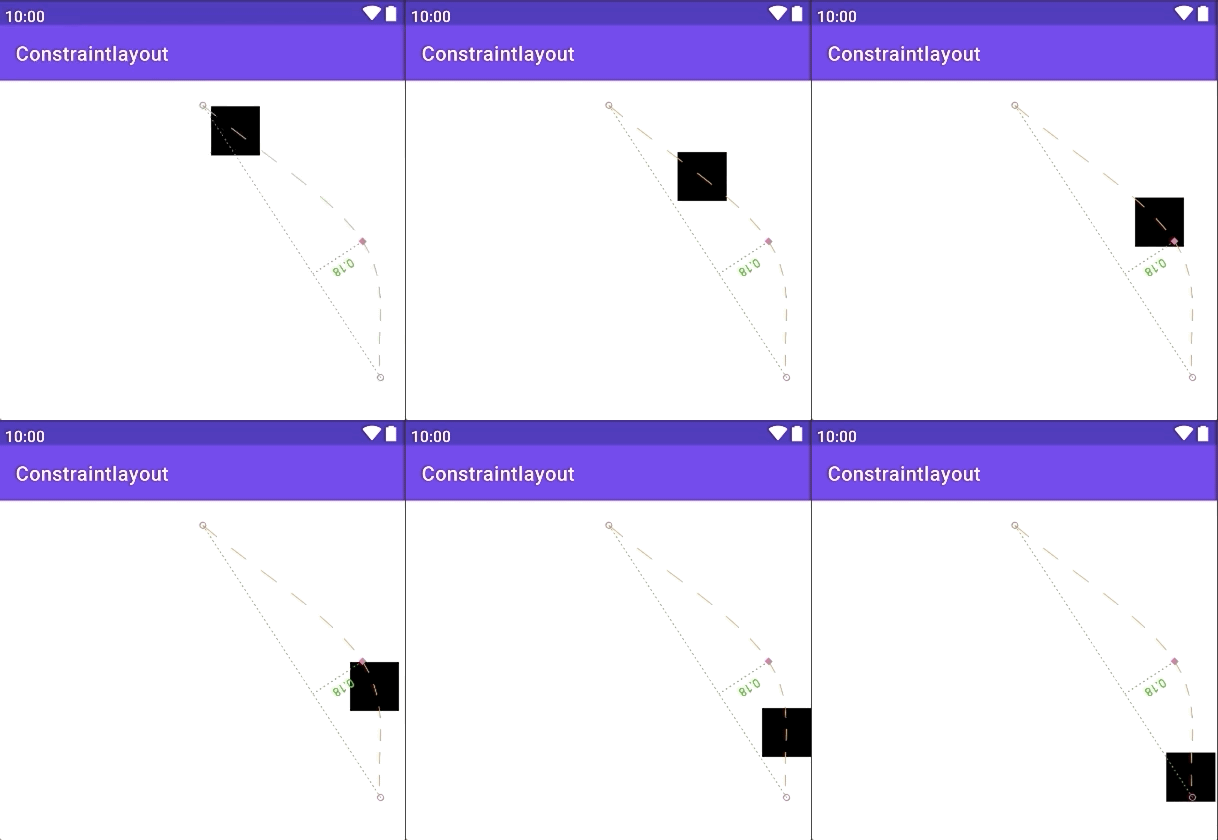
设置drawPath=“rectangles”
<KeyPosition
    app:framePosition="50"
    app:sizePercent="0.9"
    app:drawPath="rectangles"
    app:keyPositionType="deltaRelative"
    app:motionTarget="@+id/view_start_status"
    app:percentX="0.9"
    app:percentY="0.5" />
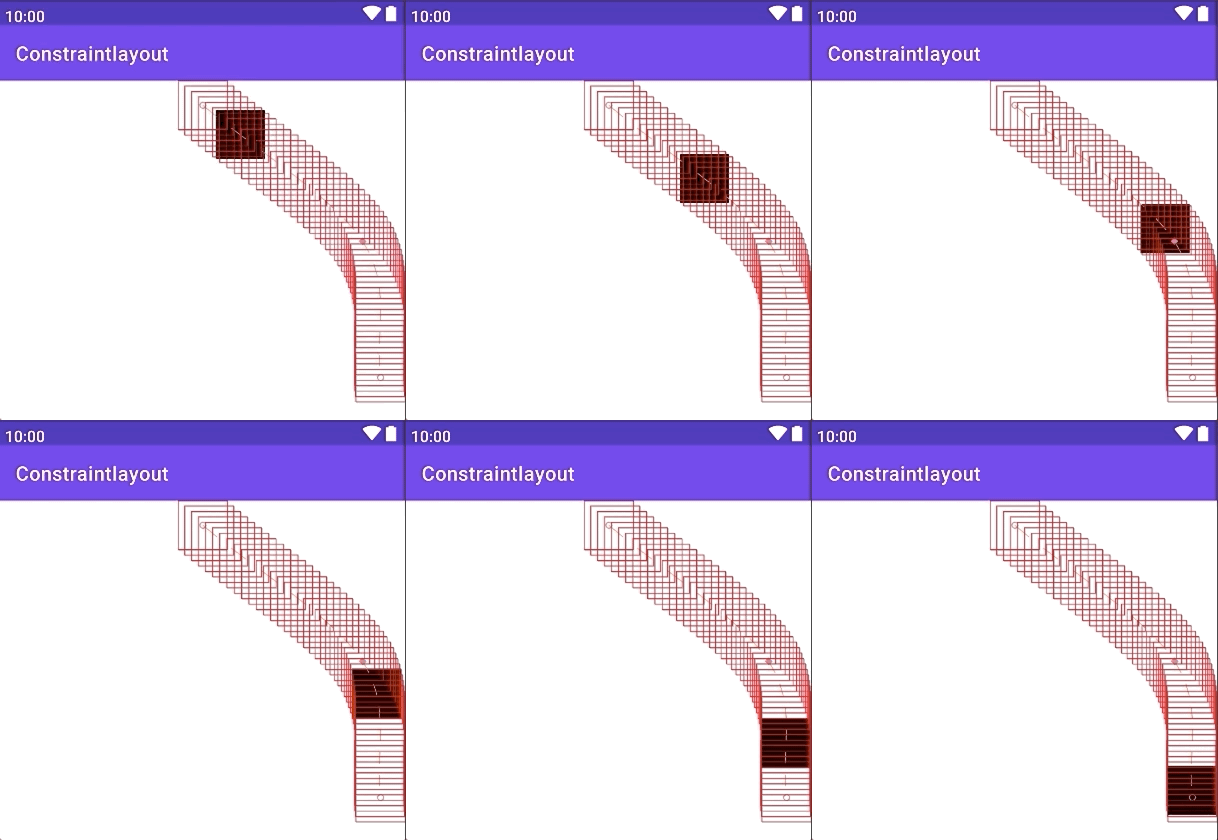
设置drawPath=“deltaRelative”
<KeyPosition
    app:framePosition="50"
    app:sizePercent="0.9"
    app:drawPath="deltaRelative"
    app:keyPositionType="deltaRelative"
    app:motionTarget="@+id/view_start_status"
    app:percentX="0.9"
    app:percentY="0.5" />
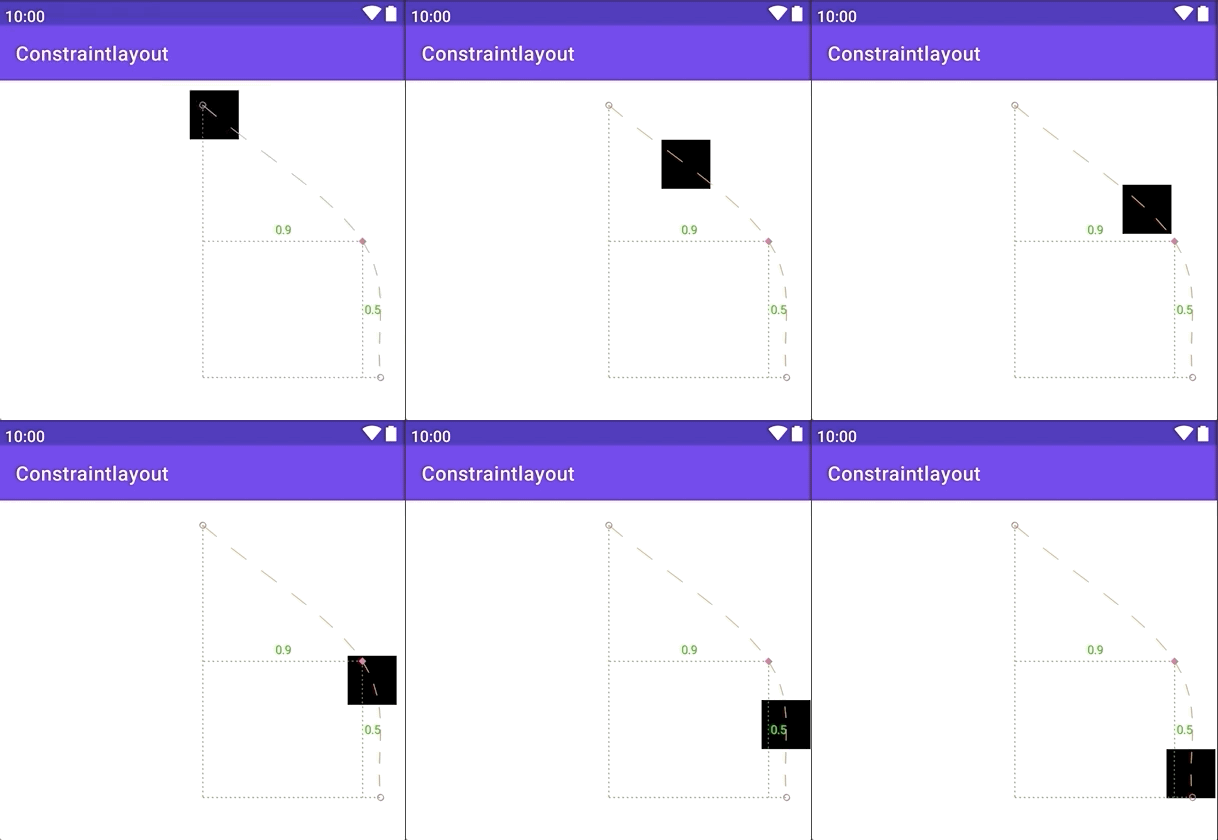
<KeyAttribute>
在动画期间控制布局属性
例如:实现View在移动过程中增加自身的缩放、透明度、旋转等属性的改变
<KeyFrameSet>
    <KeyAttribute
        android:scaleX="0.1"
        android:scaleY="0.1"
        app:framePosition="50"
        app:motionTarget="@id/view_start_status" />
    <KeyAttribute
        android:alpha="0.1"
        app:framePosition="50"
        app:motionTarget="@id/view_start_status" />
    <KeyAttribute
        android:rotation="-45"
        app:framePosition="50"
        app:motionTarget="@id/view_start_status" />
</KeyFrameSet>
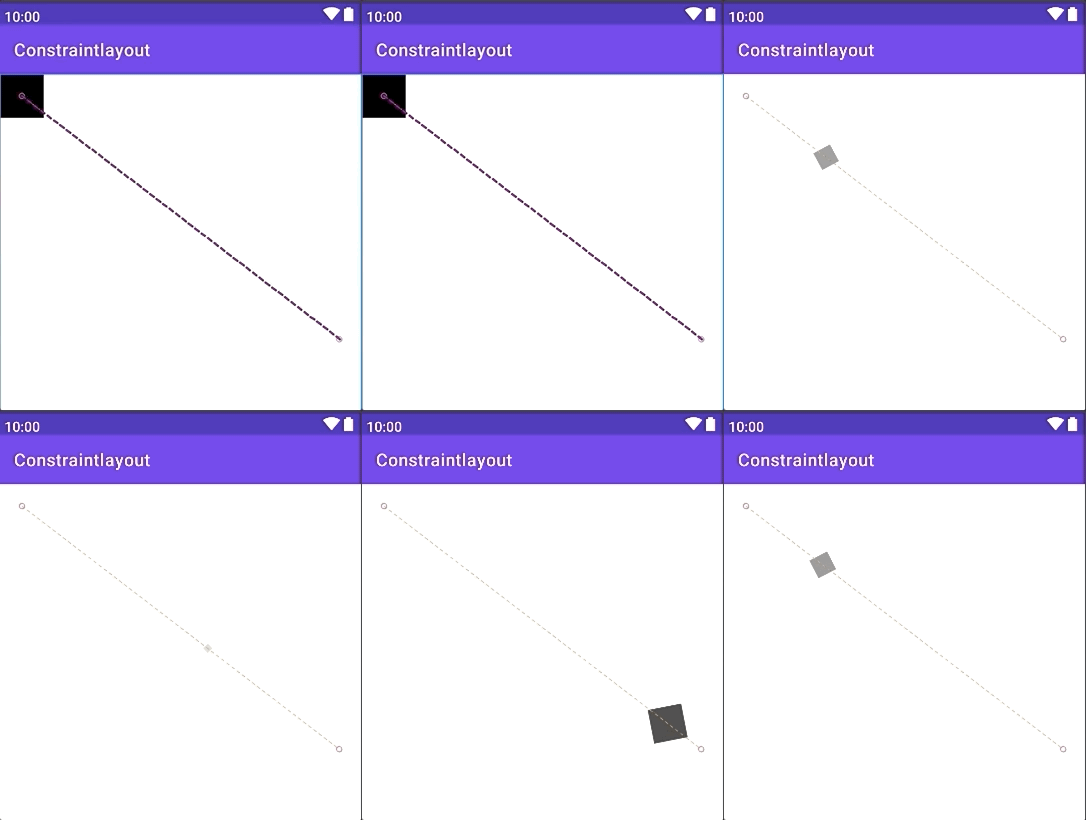
- motinotallow=“reference”
修改属性的视图id
- framePosition=“integer”
表示动画的进度,取值范围为[0,100]。30就表示动画进度执行30%的地方
常用相关属性参数
- scaleX=“float”
视图的宽度变化比例 - scaleY=“float”
视图的高度变化比例 - rotation=“float”
视图旋转的角度(以度为单位) - rotationX
视图绕x轴旋转的角度(以度为单位) - rotationY
视图绕y轴旋转的角度(以度为单位) - alpha=“float”
视图的透明度变化【0-1】 - elevation=“dimension”
视图基于Z轴的高度 - translationX=“dimension”
视图在X轴上位移的距离 - translationY=“dimension”
视图在Y轴上位移的距离 - translationZ=“dimension”
视图在Z轴上位移的距离
<CustomAttribute>
通过反射调用设置的“名称”方法
例如在关键帧处改变背景色
<KeyAttribute
        app:framePosition="0"
        app:motionTarget="@id/view_start_status">
        <CustomAttribute
            app:attributeName="BackgroundColor"
            app:customColorValue="#00ffff" />
    </KeyAttribute>
    <KeyAttribute
        app:framePosition="50"
        app:motionTarget="@id/view_start_status">
        <CustomAttribute
            app:attributeName="BackgroundColor"
            app:customColorValue="#00ff00" />
    </KeyAttribute>
</KeyFrameSet>
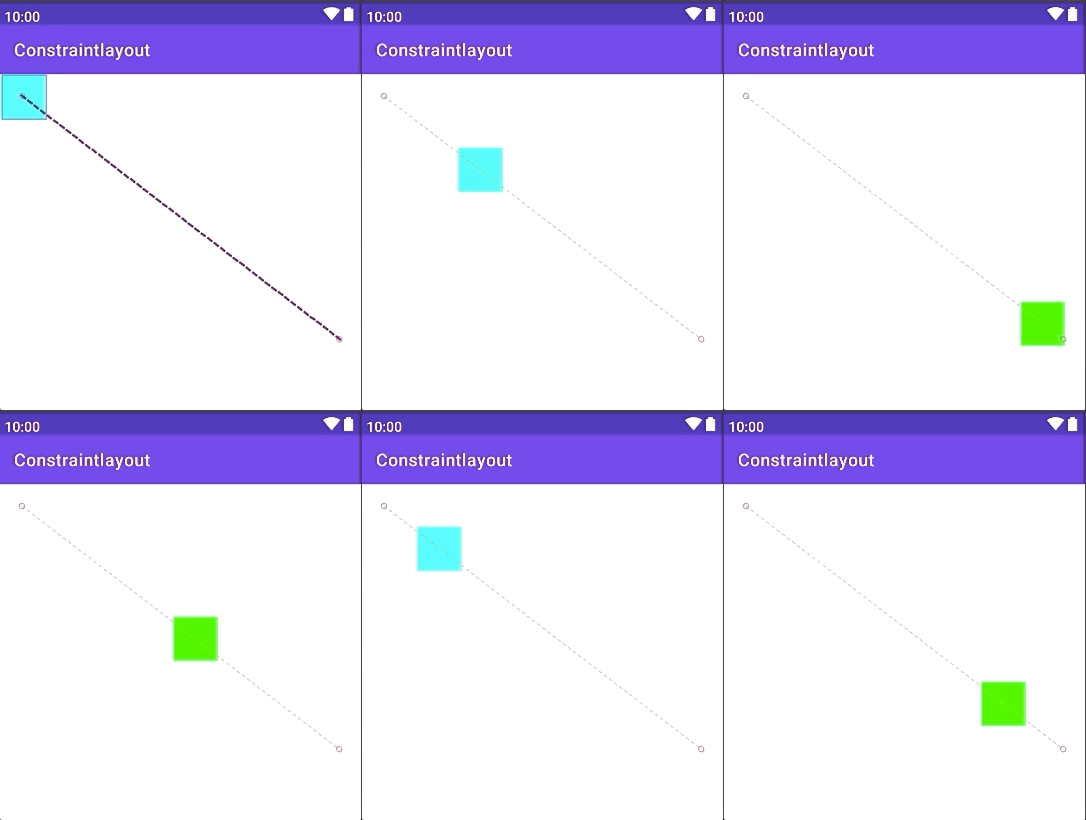
- attributeName=“string”
属性的名称。区分大小写。(BackgroundColor将寻找方法setBackgroundColor(…) - customColorValue=“color”
反射的属性为一个颜色值的属性 - customIntegerValue=“integer”
反射的属性为一个integer值的属性 - customFloatValue=“float”
反射的属性为一个float值的属性 - customStringValue=“string”
反射的属性为一个string值的属性 - customDimension=“dimension”
反射的属性为一个dimension值的属性 - customBoolean=“boolean”
反射的属性为一个boolean(true/false)值的属性 <KeyCycle>https://github.com/googlearchive/android-ConstraintLayoutExamples/releases/download/1.0/CycleEditor.jar
控制动画过程中做周期性
例如,实现View在移动动画使用正弦函数模式进行属性改变
<KeyFrameSet>
    <KeyCycle
        android:rotation="45"
        app:framePosition="50"
        app:motionTarget="@id/view_start_status"
        app:waveOffset="0"
        app:wavePeriod="1"
        app:waveShape="sin" />
</KeyFrameSet>- motionTarget=“reference”
修改属性的视图id - framePosition=“integer”
表示动画的进度,取值范围为[0,100]。30就表示动画进度执行30%的地方 - waveOffset=“float”
偏移值已添加到属性 - wavePeriod=“float”
在该区域附近循环的循环数 - waveShape=“sin|square|triangle|sawtooth|reverseSawtooth|cos|bounce”
产生设置的波的形状
sin:正弦波
<KeyFrameSet>
    <KeyCycle
        android:rotation="45"
        app:framePosition="50"
        app:motionTarget="@id/view_start_status"
        app:waveOffset="0"
        app:wavePeriod="1"
        app:waveShape="sin" />
</KeyFrameSet>
square:方形波
<KeyFrameSet>
    <KeyCycle
        android:rotation="30"
        app:framePosition="50"
        app:motionTarget="@id/view_start_status"
        app:waveOffset="0"
        app:wavePeriod="1"
        app:waveShape="square" />
</KeyFrameSet>
triangle:三角波
<KeyFrameSet>
    <KeyCycle
        android:rotation="30"
        app:framePosition="50"
        app:motionTarget="@id/view_start_status"
        app:waveOffset="0"
        app:wavePeriod="1"
        app:waveShape="square" />
</KeyFrameSet>
sawtooth:锯齿波
<KeyFrameSet>
    <KeyCycle
        android:rotation="30"
        app:framePosition="50"
        app:motionTarget="@id/view_start_status"
        app:waveOffset="0"
        app:wavePeriod="1"
        app:waveShape="sawtooth" />
</KeyFrameSet>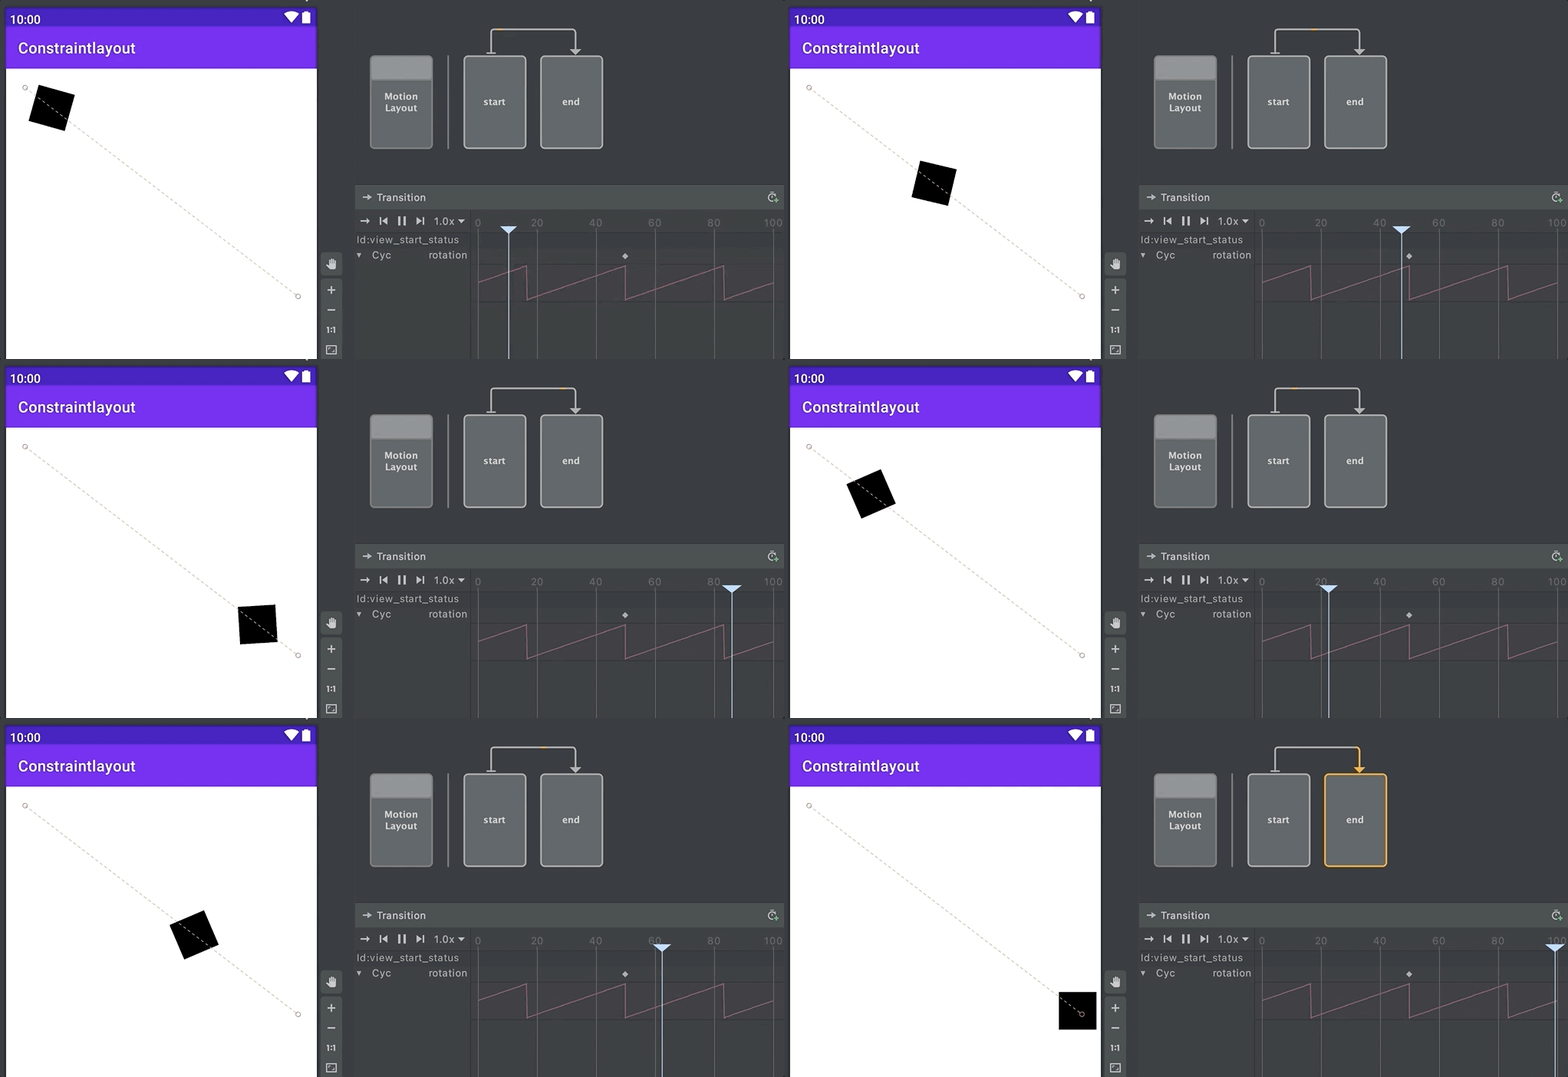
reverseSawtooth:反向锯齿波
<KeyFrameSet>
    <KeyCycle
        android:rotation="30"
        app:framePosition="50"
        app:motionTarget="@id/view_start_status"
        app:waveOffset="0"
        app:wavePeriod="1"
        app:waveShape="reverseSawtooth" />
</KeyFrameSet>
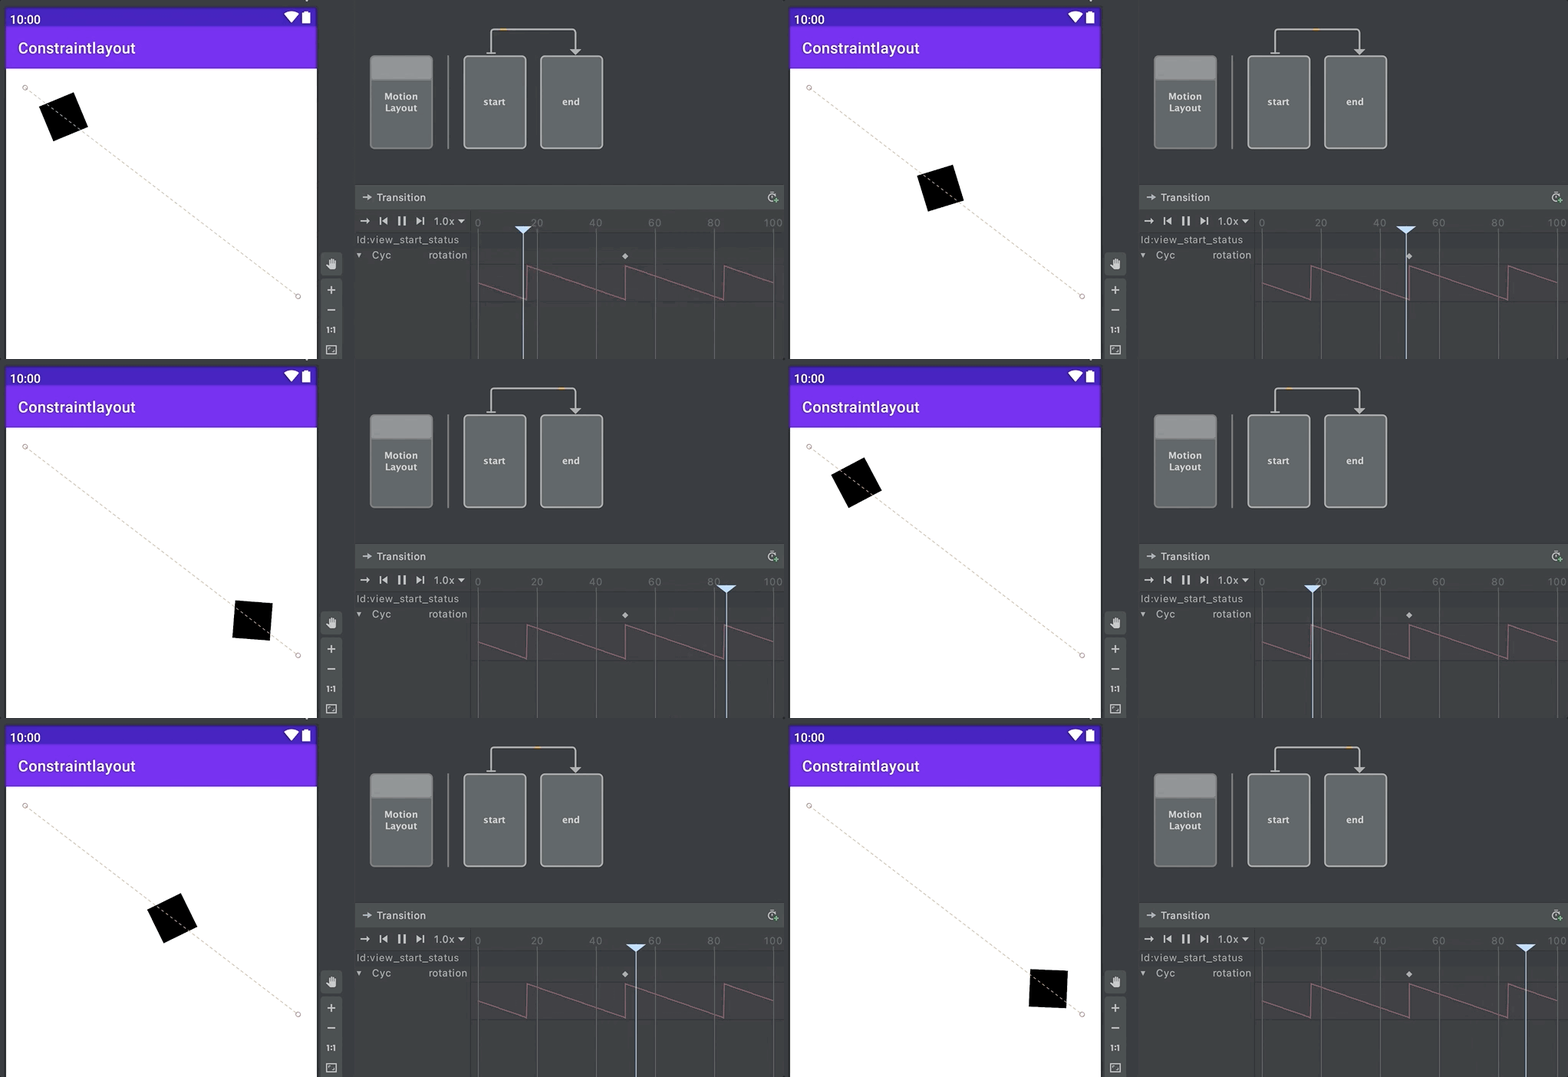
cos:余弦波
<KeyFrameSet>
    <KeyCycle
        android:rotation="30"
        app:framePosition="50"
        app:motionTarget="@id/view_start_status"
        app:waveOffset="0"
        app:wavePeriod="1"
        app:waveShape="cos" />
</KeyFrameSet>
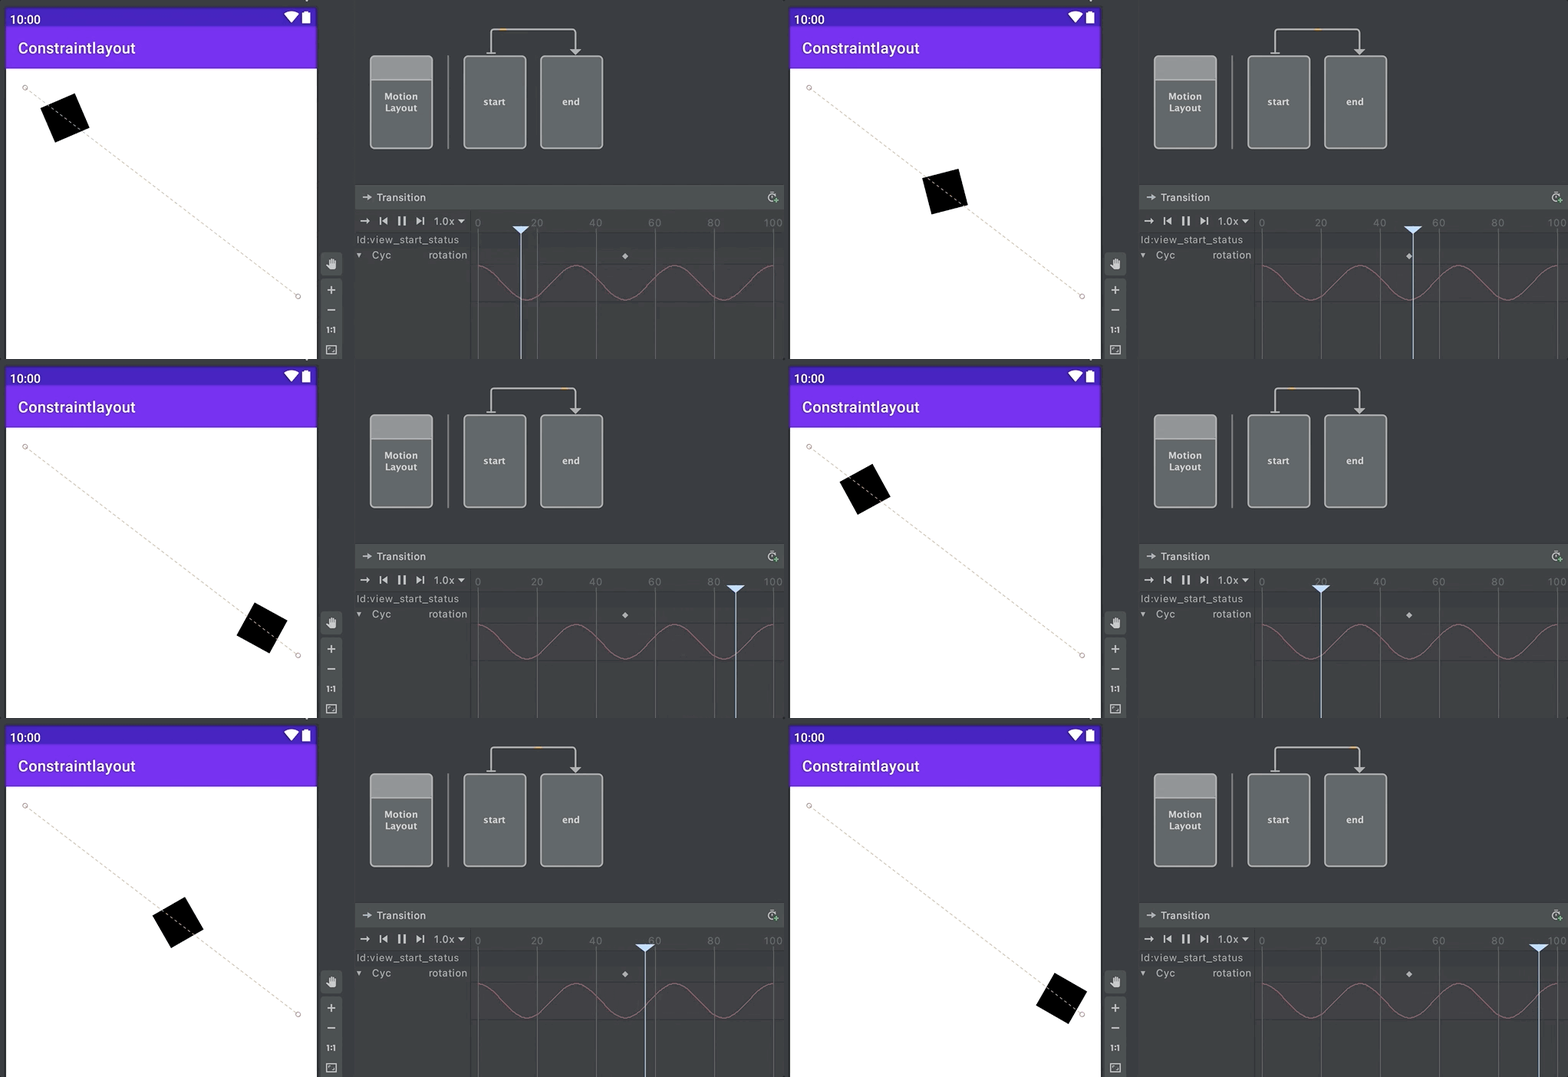
bounce:反弹
<KeyFrameSet>
    <KeyCycle
        android:rotation="30"
        app:framePosition="50"
        app:motionTarget="@id/view_start_status"
        app:waveOffset="0"
        app:wavePeriod="1"
        app:waveShape="bounce" />
</KeyFrameSet>
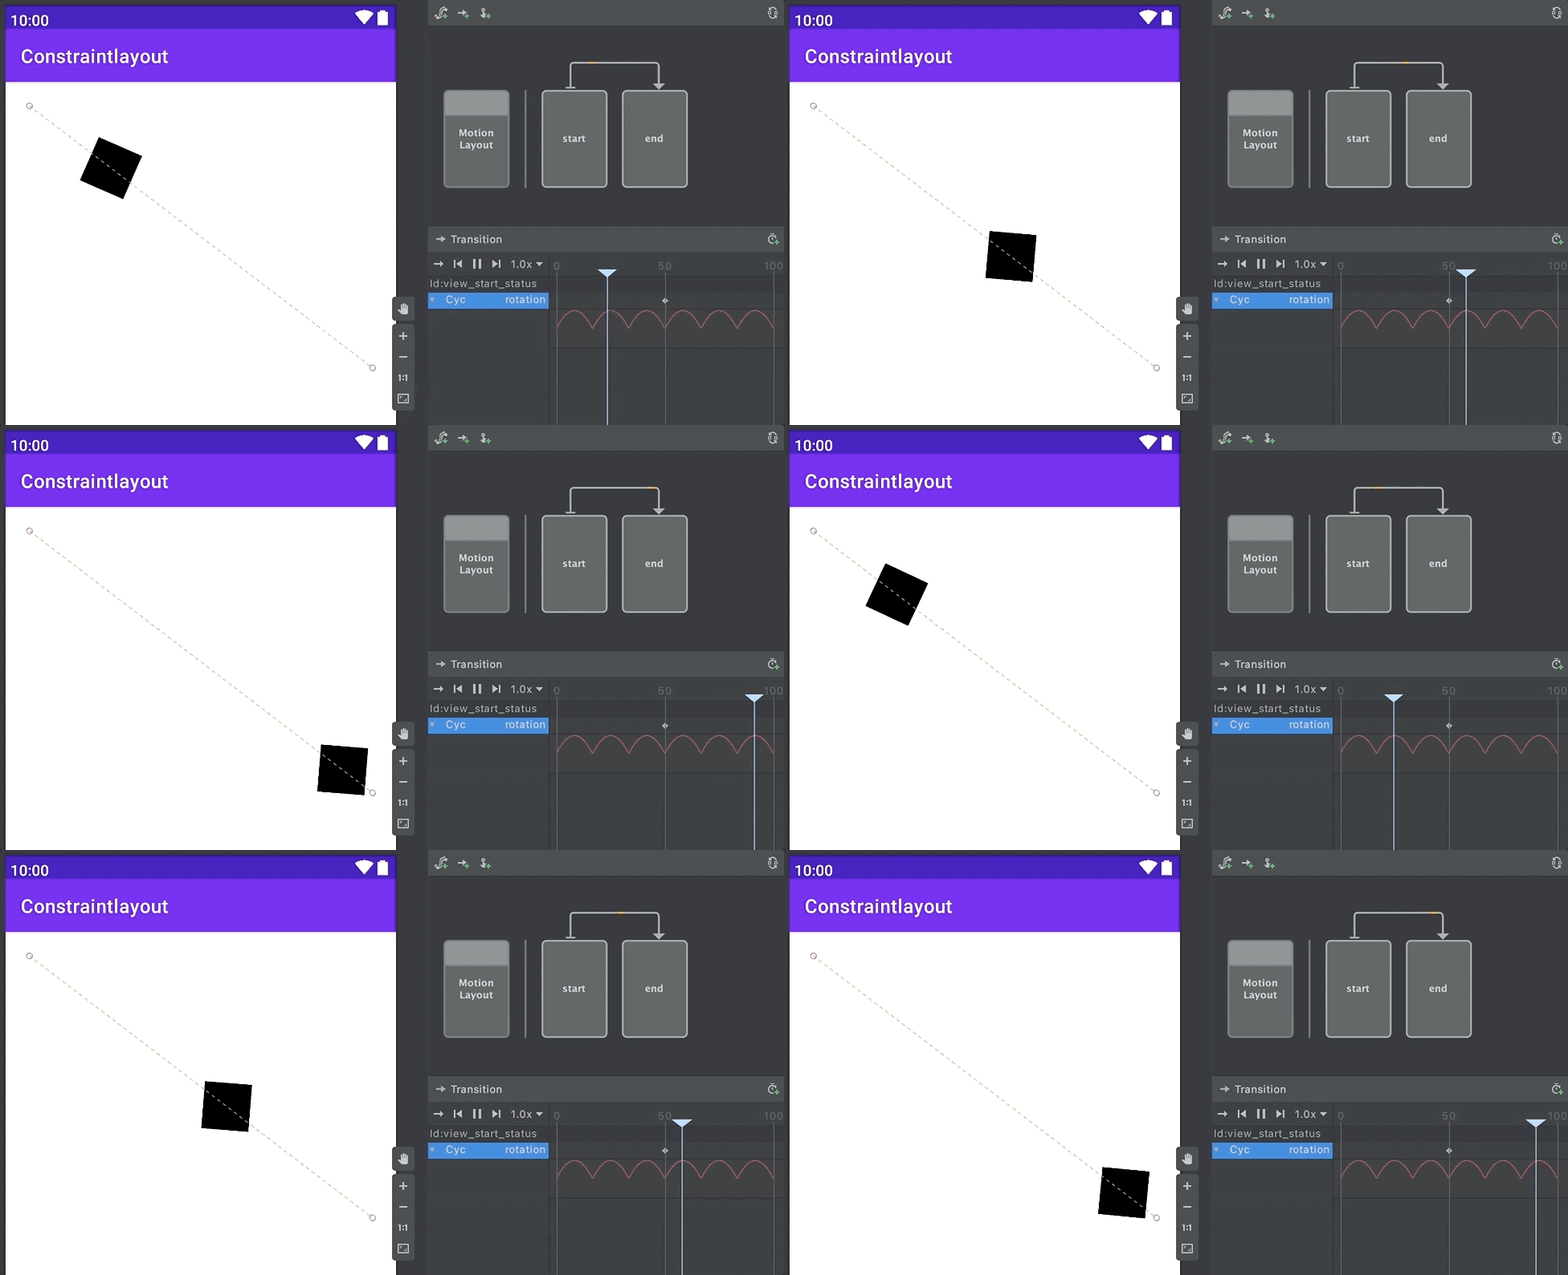
常用相关属性参数、及<CustomAttribute> 参考<KeyAttribute> 即可
<KeyTimeCycle>
控制动画在帧上做周期性
例如:在移动View未移动是也显示周期性动画,当View移动时同时也执行周期性动画
<KeyFrameSet>
    <KeyTimeCycle
        android:rotation="30"
        app:wavePeriod="1"
        app:framePosition="50"
        app:motionTarget="@id/view_start_status"
       />
</KeyFrameSet>
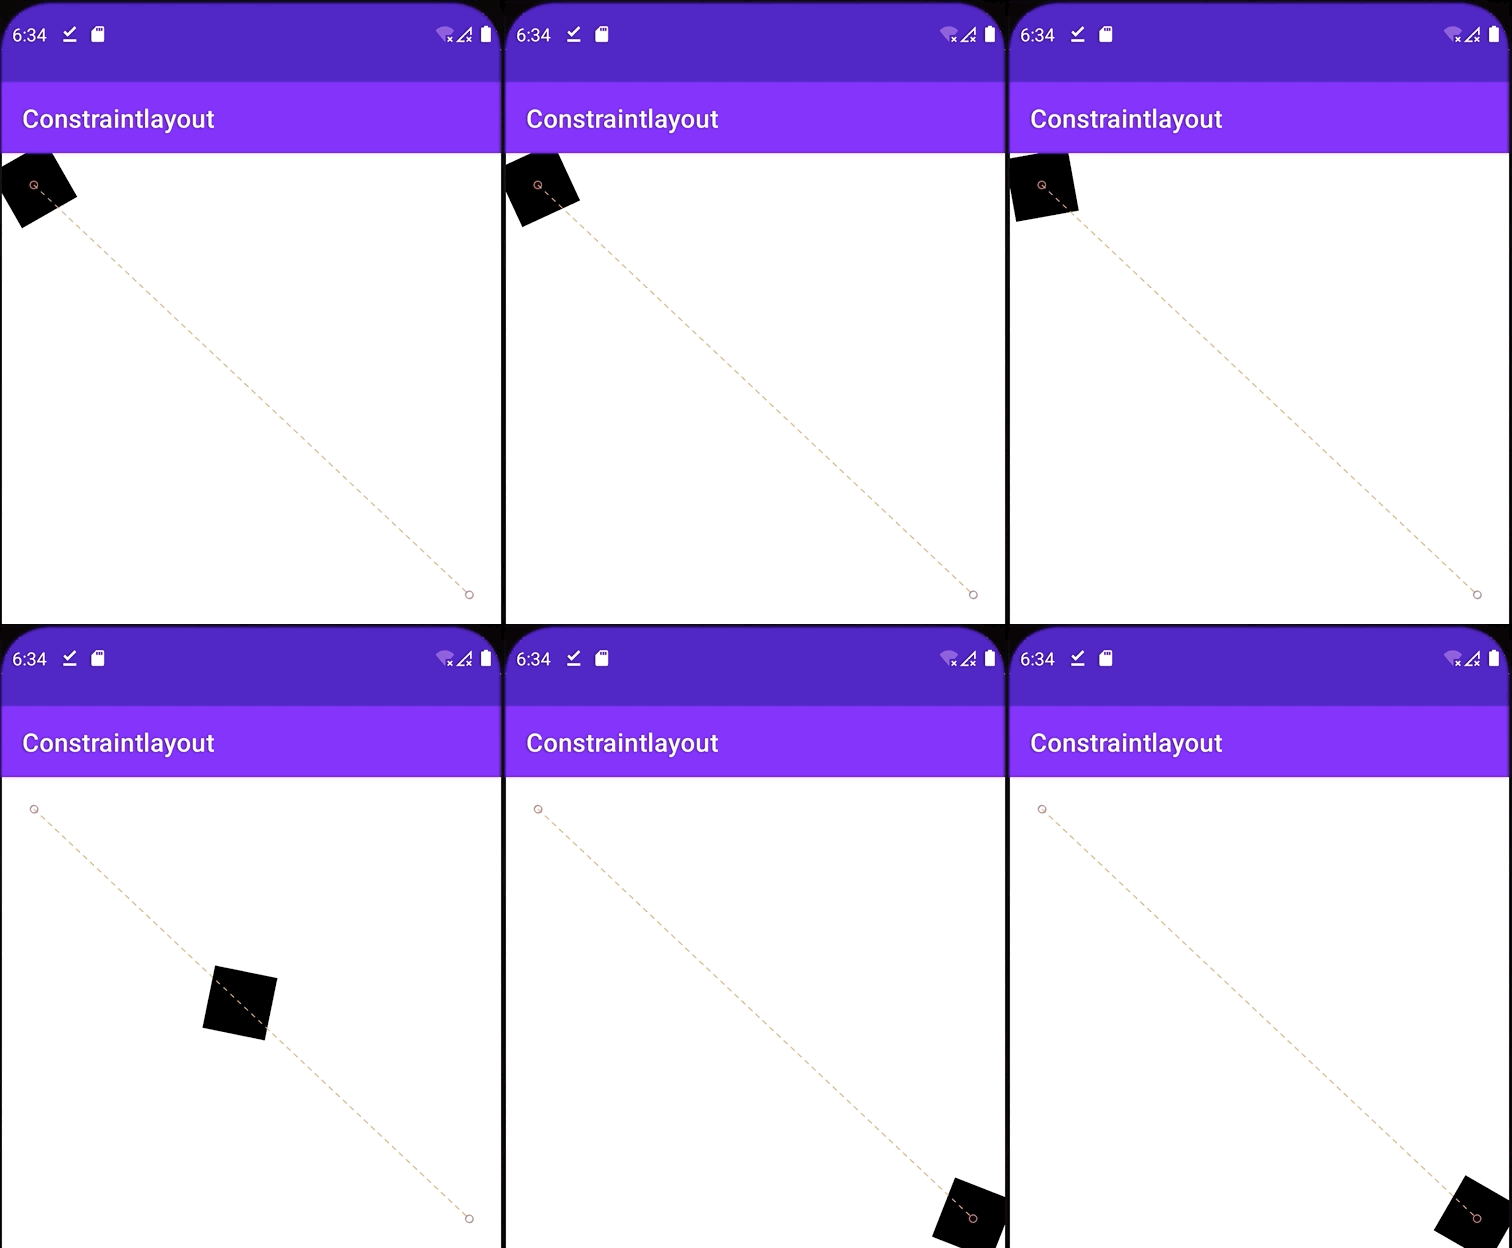
这里的参数解释:
- rotation=“float”
视图旋转的角度(以度为单位)
- wavePeriod=“float”
在该区域附近循环的循环数 - motionTarget=“reference”
修改属性的视图id - framePosition="integer“
表示动画的进度,取值范围为[0,100]。50就表示动画进度执行50%的地方
其他参数同<KeyCycle>
<KeyTrigger>
在动画过程中的固定点触发回调到代码中
例如: 在动画执行过程中,监听动画执行进度。
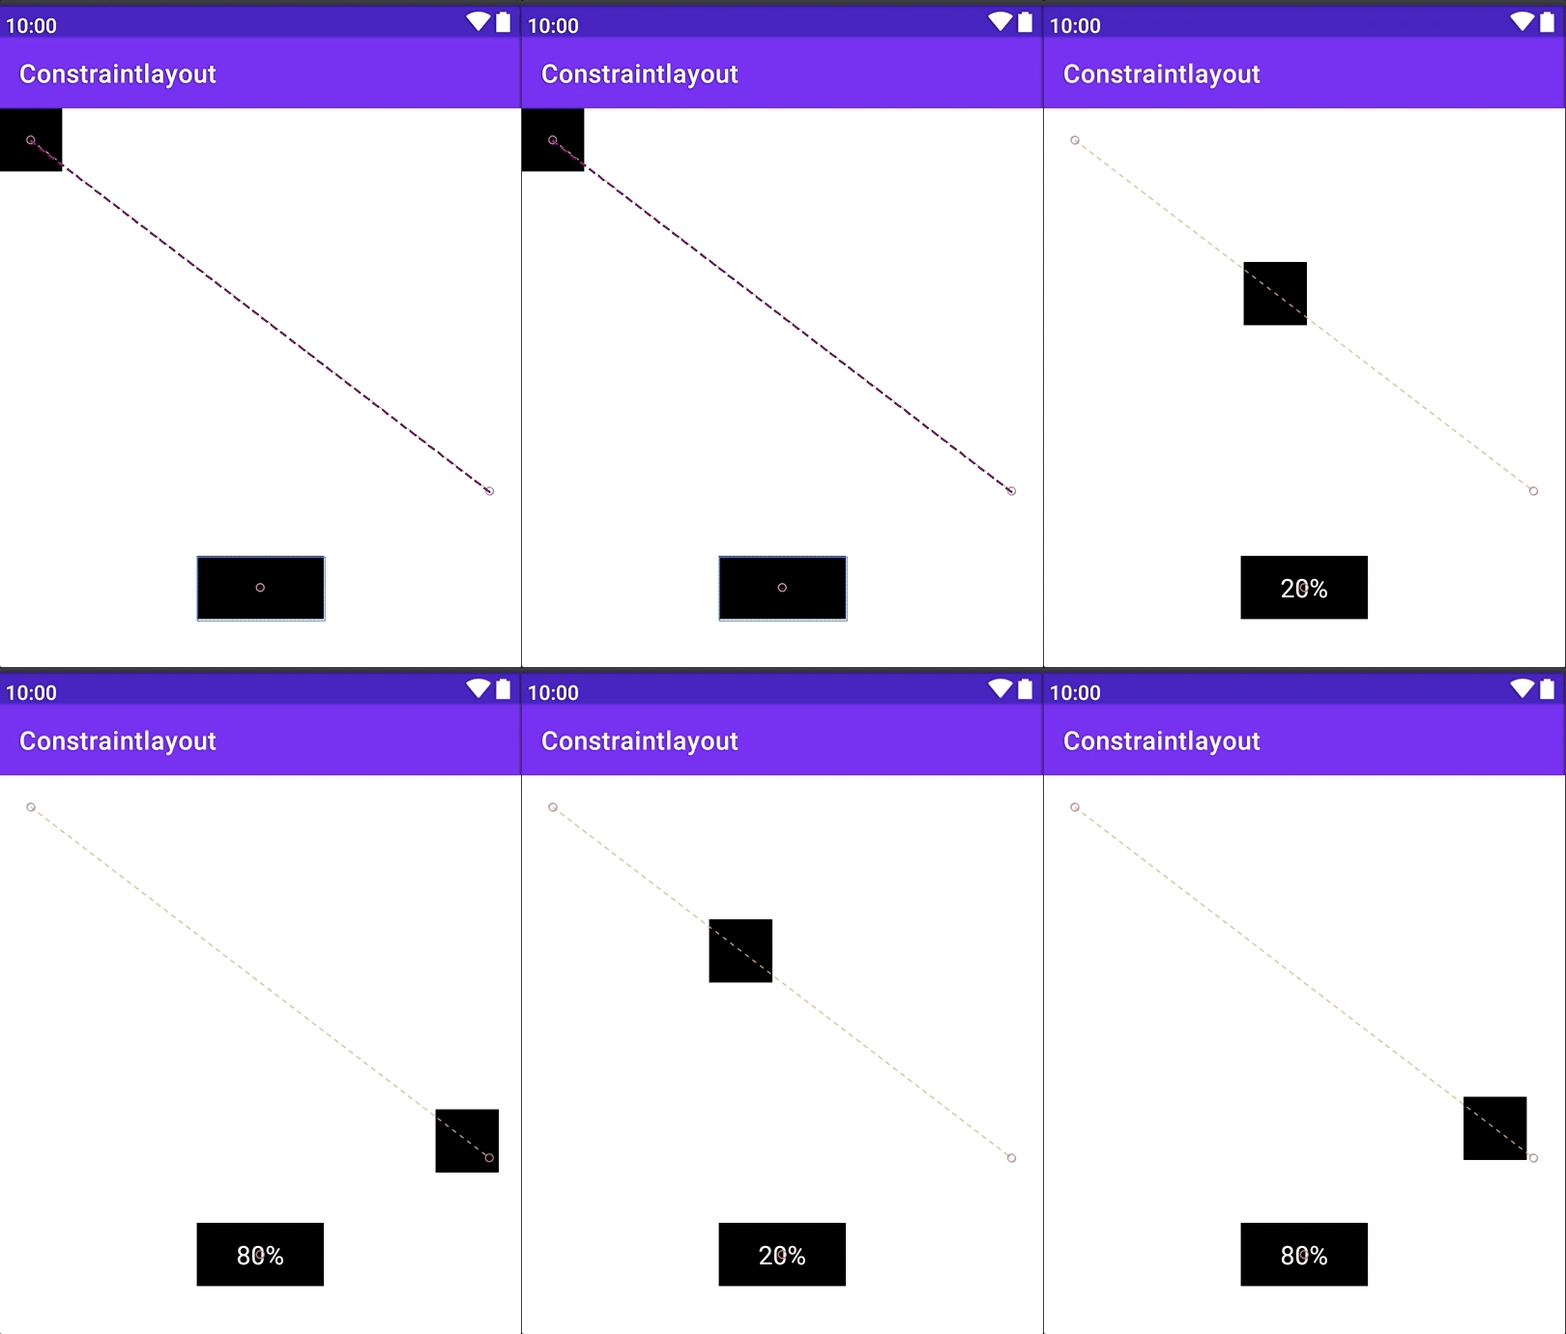
实现步骤:
1、定义KeyTrigger
<KeyFrameSet>
    <KeyTrigger
        app:framePosition="20"
        app:motionTarget="@id/tv_text"
        app:onCross="p0" />
    <KeyTrigger
        app:framePosition="50"
        app:motionTarget="@id/tv_text"
        app:onCross="p1" />
    <KeyTrigger
        app:framePosition="80"
        app:motionTarget="@id/tv_text"
        app:onCross="p2" />
</KeyFrameSet>
参数解释:
- motionTarget=“reference”
目标视图id(这里是自定义视图,因为方法写在了自定义视图里) - framePosition=“integer”
表示动画的进度,取值范围为[0,100]。50就表示动画进度执行50%的地方 - onCross=“string”
方法名称,于自定义视图中方法名一一对应。不管动画是正向还是反向,只要到达设置的framePosition 就会执行函数 - onPositiveCross=“string”
方法名称,于自定义视图中方法名一一对应。只有正向执行动画是到达设置的framePosition 才会执行函数 - onNegativeCross=“string”
方法名称,于自定义视图中方法名一一对应。只有反向执行动画是到达设置的framePosition 才会执行函数 - triggerSlack=“float”
如果动画位置未离开framePosition触发点,则不会重复调用触发器(值越大 重复率越低) - triggerId=“reference”
使用此ID回调TransitionListener监听中的onTransitionTrigger中方法 - motion_postLayoutCollision=“boolean”
Define motion pre or post layout. Post layout is more expensive but captures KeyAttributes or KeyCycle motions. - motion_triggerOnCollision=“reference”
(id) Trigger if the motionTarget collides with the other motionTarget
2、自定义视图:
class MyText(context: Context, attrs: AttributeSet) : AppCompatTextView(context, attrs) {
    fun p0() {
        text = "20%"
    }
    fun p1() {
        text = "50%"
    }
    fun p2() {
        text = "80%"
    }
}
3、使用自定义视图
<?xml version="1.0" encoding="utf-8"?>
<androidx.constraintlayout.motion.widget.MotionLayout xmlns:android="http://schemas.android.com/apk/res/android"
    xmlns:app="http://schemas.android.com/apk/res-auto"
    android:layout_width="match_parent"
    android:layout_height="match_parent"
    app:showPaths="true"
    app:layoutDescription="@xml/activity_motion_layout7_scene">

    <View
        android:id="@+id/view_start_status"
        android:layout_width="50dip"
        android:layout_height="50dip"
        android:background="@color/black" />

    <com.example.constraintlayout.MyText
        android:id="@+id/tv_text"
        android:layout_width="100dip"
        android:layout_height="50dip"
        android:textColor="@android:color/white"
        android:layout_marginBottom="200dip"
        android:textSize="20sp"
        android:gravity="center"
        app:layout_constraintLeft_toLeftOf="parent"
        app:layout_constraintRight_toRightOf="parent"
        app:layout_constraintBottom_toBottomOf="parent"
        android:background="@color/black"/>
</androidx.constraintlayout.motion.widget.MotionLayout>
MotionLayout常用API
- setDebugMode(int debugMode)
设置是否运动进行时是否显示运动路径,用来调试动画,与MotionLayout xml中app:motionDebug对应,在xml 也可以使用app:showPaths="true"来控制是否显示运动路径。
代码中设置可选参数如下:
public static final int DEBUG_SHOW_NONE = 0;//不显示路径及进度
public static final int DEBUG_SHOW_PROGRESS = 1;//只显示进度
public static final int DEBUG_SHOW_PATH = 2;//只显示路径
xml设置可选参数如下:
<enum name="NO_DEBUG" value="0"/>//不显示路径及进度
<enum name="SHOW_PROGRESS" value="1"/>//只显示进度
<enum name="SHOW_PATH" value="2"/>//只显示路径
<enum name="SHOW_ALL" value="3"/>//既显示路径页显示进度- loadLayoutDescription(int motionScene)
通过代码加载MotionScene,对应的xml中属性为app:layoutDescription - transitionToStart()
切换到动画start状态,默认有过渡效果,如果不需要过渡效果,可以通过setProgress(0) - transitionToEnd()
切换到动画end状态,默认有过渡效果,如果不需要过渡效果,可以通过setProgress(1) - setProgress(float pos)
设置动画运动进度【0-1】 - transitionToState(int id)
切换到动画某个状态,可以是start或end状态,参数id指的是ConstraintSet标签定义的id - setTransitionListener(MotionLayout.TransitionListener listener)
监听MotionLayout动画执行过程
public interface TransitionListener {
  	//开始动画时回调
    void onTransitionStarted(MotionLayout motionLayout,//当前MotionLayout视图
                             int startId,//开始状态的ID  如果未知,则为-1
                             int endId //结束状态的ID  如果未知,则为-1
                             );
	//动画改变状态时回调
    void onTransitionChange(MotionLayout motionLayout,//当前MotionLayout视图
                            int startId,//开始状态的ID  如果未知,则为-1
                            int endId,//结束状态的ID  如果未知,则为-1
                            float progress //当前动画进度【0-1】
                            );
	//完成动画时回调
    void onTransitionCompleted(MotionLayout motionLayout,//当前MotionLayout视图
                               int currentId //到达状态的ID
                              );
	//使用<KeyTrigger>中定义了 triggerId,会回调到这里
    void onTransitionTrigger(MotionLayout motionLayout,//当前MotionLayout视图
                             int triggerId,//使用triggerId设置的ID
                             boolean positive,//正向运动(start-->end)经过此处返回true,反向运动(end-->start)经过此处 返回false
                             float progress //当前动画进度【0-1】
                            );
}
使用AndroidStudio中Motion Editor
Motion Editor(Android Studio 4.0 +) 是一款专门针对 MotionLayout 布局类型所构建的可视化编辑器,通过它可以轻松地创建和预览动画效果。当你在一个包含 MotionLayout 的 XML 文件中选择 Design 或 Split 视图时,AndroidStudio 会自动打开 Motion Editor。你可以使用已在布局编辑器中所熟知的交互方式来编辑布局和 Motion Scene 文件,并可以直接在 Android Studio 预览界面中对动画效果进行预览。

预览面板
预览面板的加入使得在处理动画效果时,能够实现快速编辑并立即获取反馈,当你对动画进行细微调整之后,不用再去重新编译和部署,也能直接预览最终的动画效果。
概览面板
MotionLayout 可以对布局的变化做动画处理,在编辑器中该动画可被指定为 ConstraintSets 中的 Transition 效果,Motion Editor 可以通过 概览面板将这些状态的转变可视化(预览面板),要编辑 ConstraintSet 中的约束,点击 概览面板中相应的选项即可。

.

图中start、end是两个<ConstraintSet> 它们之间有一个 <Transition> 效果,可以通过选择start、end来修改视图的状态
选择面板
选择 面板会根据概览面板中的状态显示相应的控件信息,它有三种显示模式:
- 选中 概览面板中 Motion Layout 时的模式
Motion Editor 支持编辑基本的 MotionLayout,当在概览面板中选中 MotionLayout模式之后,你可以选择相应的组件来查看它的约束是否配置正确。 - 选中概览面板中 ConstraintSet 时的模式
当在概览面板中选中 ConstraintSet 时,选择面板会以列表的形式列出所有组件,组件旁边的选中图标意味着该组件被当前的 ConstraintSet 所约束(下图选中的是start,也可以选end)。 - 选中 概览面板中 Transition 时的模式
当在概览面板中选择 Transition 时,你可以通过动画工具栏来控制动画的播放。当选中某个动画后,点击时间轴上的 ▶按钮,可以预览动画效果。
当在概览面板中选择 Transition 时,你可以通过工具栏中添加关键帧来添加关键帧约束


属性面板
这里的属性面板同 Layout Editor 类似的属性面板,可以在这里对Constraint 的可视化效果进行预览,对Motion Scene 文件中视图的所有属性效果进行修改和添加。
当选择概述面板的选中 ConstraintSet 时,选择面板会以列表的形式列出所有组件,你选择具体组件,这时属性面板会展示组件基础可选修改选项供修改或添加。

当选择概述面板的选中 Transition 时,此时属性面板展示<Transition>基础可选属性选项供修改或添加,下方的选择面板会以列表的形式列出所有动画,你选择具体动画,这时属性面板会展示动画基础可选属性选项供修改或添加。


四、案例
仿Android系统通知栏动画效果
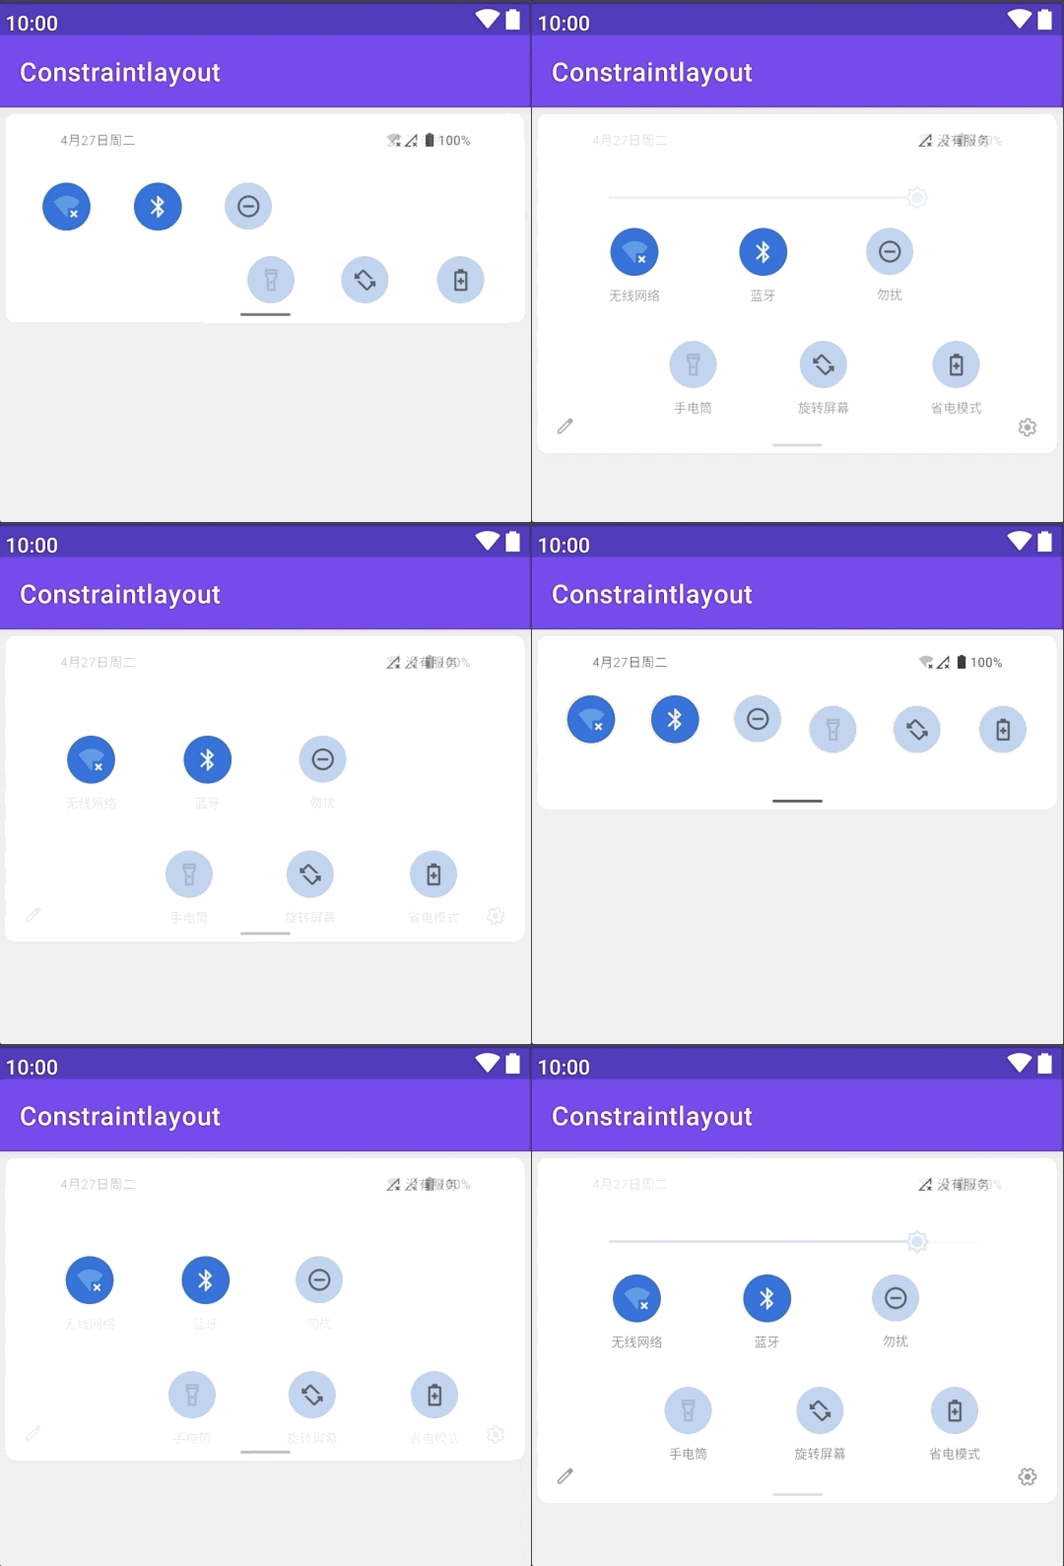
- 布局文件:
<?xml version="1.0" encoding="utf-8"?>
<androidx.constraintlayout.motion.widget.MotionLayout xmlns:android="http://schemas.android.com/apk/res/android"
    xmlns:app="http://schemas.android.com/apk/res-auto"
    android:layout_width="match_parent"
    android:layout_height="match_parent"
    android:background="#EDEDED"
    app:layoutDescription="@xml/activity_motion_layout8_scene"
    app:showPaths="false">
    <androidx.constraintlayout.utils.widget.ImageFilterView
        android:id="@+id/iv_bg"
        android:layout_width="0dp"
        android:layout_height="0dp"
        android:background="@android:color/white"
        app:round="8dip" />
    <androidx.constraintlayout.utils.widget.ImageFilterView
        android:id="@+id/iv_01"
        android:layout_width="match_parent"
        android:layout_height="wrap_content"
        android:scaleType="center"
        android:src="@mipmap/p6"
        app:altSrc="@mipmap/p5" />
    <androidx.appcompat.widget.AppCompatImageView
        android:id="@+id/iv_00"
        android:layout_width="match_parent"
        android:layout_height="wrap_content"
        android:scaleType="center"
        android:src="@mipmap/p3" />
    <androidx.appcompat.widget.AppCompatTextView1qazxsw21qazx
        android:id="@+id/tv_01"
        android:layout_width="wrap_content"
        android:layout_height="wrap_content"
        android:drawableTop="@mipmap/t1"
        android:drawablePadding="8dip"
        android:gravity="center"
        android:text="无线网络"
        android:textSize="10sp" />
    <androidx.appcompat.widget.AppCompatTextView
        android:id="@+id/tv_02"
        android:layout_width="wrap_content"
        android:layout_height="wrap_content"
        android:drawableTop="@mipmap/t2"
        android:drawablePadding="8dip"
        android:gravity="center"
        android:text="蓝牙"
        android:textSize="10sp" />
    <androidx.appcompat.widget.AppCompatTextView
        android:id="@+id/tv_03"
        android:layout_width="wrap_content"
        android:layout_height="wrap_content"
        android:drawableTop="@mipmap/t3"
        android:drawablePadding="8dip"
        android:gravity="center"
        android:text="勿扰"
        android:textSize="10sp" />
    <androidx.appcompat.widget.AppCompatTextView
        android:id="@+id/tv_04"
        android:layout_width="wrap_content"
        android:layout_height="wrap_content"
        android:drawableTop="@mipmap/t4"
        android:drawablePadding="8dip"
        android:gravity="center"
        android:text="手电筒"
        android:textSize="10sp" />
    <androidx.appcompat.widget.AppCompatTextView
        android:id="@+id/tv_05"
        android:layout_width="wrap_content"
        android:layout_height="wrap_content"
        android:drawableTop="@mipmap/t5"
        android:drawablePadding="8dip"
        android:gravity="center"
        android:text="旋转屏幕"
        android:textSize="10sp" />
    <androidx.appcompat.widget.AppCompatTextView
        android:id="@+id/tv_06"
        android:layout_width="wrap_content"
        android:layout_height="wrap_content"
        android:drawableTop="@mipmap/t6"
        android:drawablePadding="8dip"
        android:gravity="center"
        android:text="省电模式"
        android:textSize="10sp" />
    <androidx.appcompat.widget.AppCompatImageView
        android:id="@+id/iv_02"
        android:layout_width="wrap_content"
        android:layout_height="wrap_content"
        android:src="@mipmap/p1" />
    <androidx.appcompat.widget.AppCompatImageView
        android:id="@+id/iv_04"
        android:layout_width="wrap_content"
        android:layout_height="wrap_content"
        android:scaleType="center"
        android:src="@mipmap/p7" />
    <androidx.appcompat.widget.AppCompatImageView
        android:id="@+id/iv_03"
        android:layout_width="wrap_content"
        android:layout_height="wrap_content"
        android:src="@mipmap/p2" />
</androidx.constraintlayout.motion.widget.MotionLayout>- 动画xml文件
<?xml version="1.0" encoding="utf-8"?>
<MotionScene xmlns:android="http://schemas.android.com/apk/res/android"
xmlns:app="http://schemas.android.com/apk/res-auto">
<ConstraintSet android:id="@+id/start">
<Constraint
android:id="@+id/iv_bg"
android:layout_width="0dp"
android:layout_height="0dp"
android:layout_marginLeft="5dip"
android:layout_marginTop="5dip"
android:layout_marginRight="5dip"
app:layout_constraintBottom_toBottomOf="@id/iv_04"
app:layout_constraintLeft_toLeftOf="parent"
app:layout_constraintRight_toRightOf="parent"
app:layout_constraintTop_toTopOf="parent"/>
<Constraint
android:id="@+id/iv_00"
android:layout_width="match_parent"
android:layout_height="40dip"
app:layout_constraintLeft_toLeftOf="parent"
app:layout_constraintRight_toRightOf="parent"
app:layout_constraintTop_toBottomOf="@id/iv_01" />
<Constraint
android:id="@+id/iv_01"
android:layout_width="match_parent"
android:layout_height="50dip"
app:layout_constraintTop_toTopOf="parent">
<CustomAttribute
app:attributeName="Crossfade"
app:customFloatValue="0" />
</Constraint>
<Constraint
android:id="@+id/iv_02"
android:layout_width="wrap_content"
android:layout_height="wrap_content"
android:layout_marginLeft="20dip"
app:layout_constraintLeft_toLeftOf="parent"
app:layout_constraintTop_toBottomOf="@id/tv_03" />
<Constraint
android:id="@+id/iv_03"
android:layout_width="wrap_content"
android:layout_height="wrap_content"
android:layout_marginRight="20dip"
app:layout_constraintRight_toRightOf="parent"
app:layout_constraintTop_toBottomOf="@id/tv_06" />
<Constraint
android:id="@+id/iv_04"
android:layout_width="wrap_content"
android:layout_height="wrap_content"
android:alpha="1"
app:layout_constraintLeft_toLeftOf="parent"
app:layout_constraintRight_toRightOf="parent"
app:layout_constraintTop_toBottomOf="@id/iv_03" />
<Constraint
android:id="@+id/tv_01"
android:layout_width="wrap_content"
android:layout_height="wrap_content"
app:layout_constraintLeft_toLeftOf="parent"
app:layout_constraintRight_toLeftOf="@id/tv_02"
app:layout_constraintTop_toBottomOf="@id/iv_01" />
<Constraint
android:id="@+id/tv_02"
android:layout_width="wrap_content"
android:layout_height="wrap_content"
app:layout_constraintLeft_toRightOf="@id/tv_01"
app:layout_constraintRight_toLeftOf="@id/tv_03"
app:layout_constraintTop_toTopOf="@id/tv_01" />
<Constraint
android:id="@+id/tv_03"
android:layout_width="wrap_content"
android:layout_height="wrap_content"
app:layout_constraintLeft_toRightOf="@id/tv_02"
app:layout_constraintRight_toLeftOf="@id/tv_04"
app:layout_constraintTop_toTopOf="@id/tv_01" />
<Constraint
android:id="@+id/tv_04"
android:layout_width="wrap_content"
android:layout_height="wrap_content"
app:layout_constraintLeft_toRightOf="@id/tv_03"
app:layout_constraintRight_toLeftOf="@id/tv_05"
app:layout_constraintTop_toBottomOf="@id/iv_01" />
<Constraint
android:id="@+id/tv_05"
android:layout_width="wrap_content"
android:layout_height="wrap_content"
app:layout_constraintLeft_toRightOf="@id/tv_04"
app:layout_constraintRight_toLeftOf="@id/tv_06"
app:layout_constraintTop_toTopOf="@id/tv_04" />
<Constraint
android:id="@+id/tv_06"
android:layout_width="wrap_content"
android:layout_height="wrap_content"
app:layout_constraintLeft_toRightOf="@id/tv_05"
app:layout_constraintRight_toRightOf="parent"
app:layout_constraintTop_toTopOf="@id/tv_04" />
</ConstraintSet>
<ConstraintSet android:id="@+id/end">
<Constraint
android:id="@+id/iv_bg"
android:layout_width="0dp"
android:layout_height="0dp"
android:layout_marginLeft="5dip"
android:layout_marginTop="5dip"
android:layout_marginRight="5dip"
app:layout_constraintBottom_toBottomOf="@id/iv_04"
app:layout_constraintLeft_toLeftOf="parent"
app:layout_constraintRight_toRightOf="parent"
app:layout_constraintTop_toTopOf="parent">
</Constraint>
<Constraint
android:id="@+id/iv_00"
android:layout_width="match_parent"
android:layout_height="40dip"
app:layout_constraintLeft_toLeftOf="parent"
app:layout_constraintRight_toRightOf="parent"
app:layout_constraintTop_toBottomOf="@id/iv_01" />
<Constraint
android:id="@+id/iv_01"
android:layout_width="match_parent"
android:layout_height="50dip"
app:layout_constraintTop_toTopOf="parent">
<CustomAttribute
app:attributeName="Crossfade"
app:customFloatValue="1" />
</Constraint>
<Constraint
android:id="@+id/iv_02"
android:layout_width="wrap_content"
android:layout_height="wrap_content"
android:layout_marginLeft="20dip"
android:layout_marginTop="20dip"
app:layout_constraintLeft_toLeftOf="parent"
app:layout_constraintTop_toBottomOf="@id/tv_04" />
<Constraint
android:id="@+id/iv_03"
android:layout_width="wrap_content"
android:layout_height="wrap_content"
android:layout_marginTop="20dip"
android:layout_marginRight="20dip"
app:layout_constraintRight_toRightOf="parent"
app:layout_constraintTop_toBottomOf="@id/tv_06" />
<Constraint
android:id="@+id/iv_04"
android:layout_width="wrap_content"
android:layout_height="wrap_content"
android:alpha="0"
app:layout_constraintLeft_toLeftOf="parent"
app:layout_constraintRight_toRightOf="parent"
app:layout_constraintTop_toBottomOf="@id/iv_03" />
<Constraint
android:id="@+id/tv_01"
android:layout_width="wrap_content"
android:layout_height="wrap_content"
android:layout_marginTop="20dip"
app:layout_constraintLeft_toLeftOf="parent"
app:layout_constraintRight_toLeftOf="@id/tv_02"
app:layout_constraintTop_toBottomOf="@id/iv_00">
</Constraint>
<Constraint
android:id="@+id/tv_02"
android:layout_width="wrap_content"
android:layout_height="wrap_content"
app:layout_constraintLeft_toRightOf="@id/tv_01"
app:layout_constraintRight_toLeftOf="@id/tv_03"
app:layout_constraintTop_toTopOf="@id/tv_01" />
<Constraint
android:id="@+id/tv_03"
android:layout_width="wrap_content"
android:layout_height="wrap_content"
app:layout_constraintLeft_toRightOf="@id/tv_02"
app:layout_constraintRight_toRightOf="parent"
app:layout_constraintTop_toTopOf="@id/tv_01" />
<Constraint
android:id="@+id/tv_04"
android:layout_width="wrap_content"
android:layout_height="wrap_content"
android:layout_marginTop="30dip"
app:layout_constraintLeft_toLeftOf="parent"
app:layout_constraintRight_toLeftOf="@id/tv_05"
app:layout_constraintTop_toBottomOf="@id/tv_01" />
<Constraint
android:id="@+id/tv_05"
android:layout_width="wrap_content"
android:layout_height="wrap_content"
app:layout_constraintLeft_toRightOf="@id/tv_04"
app:layout_constraintRight_toLeftOf="@id/tv_06"
app:layout_constraintTop_toTopOf="@id/tv_04" />
<Constraint
android:id="@+id/tv_06"
android:layout_width="wrap_content"
android:layout_height="wrap_content"
app:layout_constraintLeft_toRightOf="@id/tv_05"
app:layout_constraintRight_toRightOf="parent"
app:layout_constraintTop_toTopOf="@id/tv_04" />
</ConstraintSet>
<Transition
app:constraintSetEnd="@id/end"
app:constraintSetStart="@+id/start">
<KeyFrameSet>
<KeyAttribute
app:framePosition="0"
app:motionTarget="@id/tv_01">
<CustomAttribute
app:attributeName="TextColor"
app:customColorValue="@android:color/transparent" />
</KeyAttribute>
<KeyAttribute
app:framePosition="50"
app:motionTarget="@id/tv_01">
<CustomAttribute
app:attributeName="TextColor"
app:customColorValue="@android:color/transparent" />
</KeyAttribute>
<KeyAttribute
app:framePosition="100"
app:motionTarget="@id/tv_01">
<CustomAttribute
app:attributeName="TextColor"
app:customColorValue="@android:color/black" />
</KeyAttribute>
<KeyAttribute
app:framePosition="0"
app:motionTarget="@id/tv_02">
<CustomAttribute
app:attributeName="TextColor"
app:customColorValue="@android:color/transparent" />
</KeyAttribute>
<KeyAttribute
app:framePosition="50"
app:motionTarget="@id/tv_02">
<CustomAttribute
app:attributeName="TextColor"
app:customColorValue="@android:color/transparent" />
</KeyAttribute>
<KeyAttribute
app:framePosition="100"
app:motionTarget="@id/tv_02">
<CustomAttribute
app:attributeName="TextColor"
app:customColorValue="@android:color/black" />
</KeyAttribute>
<KeyAttribute
app:framePosition="0"
app:motionTarget="@id/tv_03">
<CustomAttribute
app:attributeName="TextColor"
app:customColorValue="@android:color/transparent" />
</KeyAttribute>
<KeyAttribute
app:framePosition="50"
app:motionTarget="@id/tv_03">
<CustomAttribute
app:attributeName="TextColor"
app:customColorValue="@android:color/transparent" />
</KeyAttribute>
<KeyAttribute
app:framePosition="100"
app:motionTarget="@id/tv_03">
<CustomAttribute
app:attributeName="TextColor"
app:customColorValue="@android:color/black" />
</KeyAttribute>
<KeyAttribute
app:framePosition="0"
app:motionTarget="@id/tv_04">
<CustomAttribute
app:attributeName="TextColor"
app:customColorValue="@android:color/transparent" />
</KeyAttribute>
<KeyAttribute
app:framePosition="50"
app:motionTarget="@id/tv_04">
<CustomAttribute
app:attributeName="TextColor"
app:customColorValue="@android:color/transparent" />
</KeyAttribute>
<KeyAttribute
app:framePosition="100"
app:motionTarget="@id/tv_04">
<CustomAttribute
app:attributeName="TextColor"
app:customColorValue="@android:color/black" />
</KeyAttribute>
<KeyAttribute
app:framePosition="0"
app:motionTarget="@id/tv_05">
<CustomAttribute
app:attributeName="TextColor"
app:customColorValue="@android:color/transparent" />
</KeyAttribute>
<KeyAttribute
app:framePosition="50"
app:motionTarget="@id/tv_05">
<CustomAttribute
app:attributeName="TextColor"
app:customColorValue="@android:color/transparent" />
</KeyAttribute>
<KeyAttribute
app:framePosition="100"
app:motionTarget="@id/tv_05">
<CustomAttribute
app:attributeName="TextColor"
app:customColorValue="@android:color/black" />
</KeyAttribute>
<KeyAttribute
app:framePosition="0"
app:motionTarget="@id/tv_06">
<CustomAttribute
app:attributeName="TextColor"
app:customColorValue="@android:color/transparent" />
</KeyAttribute>
<KeyAttribute
app:framePosition="50"
app:motionTarget="@id/tv_06">
<CustomAttribute
app:attributeName="TextColor"
app:customColorValue="@android:color/transparent" />
</KeyAttribute>
<KeyAttribute
app:framePosition="100"
app:motionTarget="@id/tv_06">
<CustomAttribute
app:attributeName="TextColor"
app:customColorValue="@android:color/black" />
</KeyAttribute>
<KeyAttribute
android:alpha="0"
app:framePosition="0"
app:motionTarget="@id/iv_00" />
<KeyAttribute
android:alpha="0"
app:framePosition="70"
app:motionTarget="@id/iv_00" />
<KeyAttribute
android:alpha="1"
app:framePosition="100"
app:motionTarget="@id/iv_00" />
<KeyAttribute
android:alpha="0"
app:framePosition="0"
app:motionTarget="@id/iv_02" />
<KeyAttribute
android:alpha="0"
app:framePosition="50"
app:motionTarget="@id/iv_02" />
<KeyAttribute
android:alpha="1"
app:framePosition="100"
app:motionTarget="@id/iv_02" />
<KeyAttribute
android:alpha="0"
app:framePosition="0"
app:motionTarget="@id/iv_03" />
<KeyAttribute
android:alpha="0"
app:framePosition="50"
app:motionTarget="@id/iv_03" />
<KeyAttribute
android:alpha="1"
app:framePosition="100"
app:motionTarget="@id/iv_03" />
<KeyPosition
app:framePosition="50"
app:keyPositionType="pathRelative"
app:motionTarget="@id/tv_01"
app:percentX="0.4"
app:percentY="0" />
<KeyPosition
app:framePosition="50"
app:keyPositionType="pathRelative"
app:motionTarget="@id/tv_02"
app:percentX="0.4"
app:percentY="0" />
<KeyPosition
app:framePosition="50"
app:keyPositionType="pathRelative"
app:motionTarget="@id/tv_03"
app:percentX="0.4"
app:percentY="0" />
<KeyPosition
app:framePosition="10"
app:keyPositionType="deltaRelative"
app:motionTarget="@id/tv_04"
app:percentX="0.1"
app:percentY="0.3" />
<KeyPosition
app:framePosition="10"
app:keyPositionType="deltaRelative"
app:motionTarget="@id/tv_05"
app:percentX="0.1"
app:percentY="0.3" />
<KeyPosition
app:framePosition="10"
app:keyPositionType="deltaRelative"
app:motionTarget="@id/tv_06"
app:percentX="0.1"
app:percentY="0.3" />
<KeyCycle
android:rotation="360"
app:framePosition="0"
app:motionTarget="@id/iv_03"
app:waveOffset="0"
app:wavePeriod="1"
app:waveShape="sin" />
</KeyFrameSet>
<OnSwipe app:dragDirection="dragDown" />
</Transition>
</MotionScene>
